HAMi vGPU 原理分析 Part5:HAMi-core(libvgpu.so) vCUDA 工作原理分析
上篇我们分析了 hami-scheduler 中 Spread、Binpack 等高级调度策略是怎么实现的。
本文为 HAMi 原理分析的第五篇,简单分析一下 HAMi-Core 的工作原理,包括怎么生效的,CUDA API 怎么拦截的,以及是怎么实现的对 GPU 的 core、memory 资源的 limit 的。
本文摘自:https://mp.weixin.qq.com/s/vN3uDRPpAP3UmE2Hgn75vg
主要解决下面这几个问题:
-
libvgpu.so 是怎么生效的?
-
CUDA API 怎么拦截的?
-
gpu memory 是怎么限制的?
-
gpu core 是怎么限制的?
对 C 并不是很熟悉,所以有什么地方写错了,大家一定留言指正呀~
TL;DR
libvgpu.so 是怎么生效的?
-
device plugin 在 Allocate 方法中使用 hostPath 方式将宿主机上的 libvgpu.so 挂载到 Pod 中
-
并通过 LD_PRELOAD 方式实现优先加载上一步中挂载的 libvgpu.so 库,使其生效
CUDA API 怎么拦截的?
通过重写 dlsym 函数,以劫持 NVIDIA 动态链接库(如 CUDA 和 NVML)的调用,特别是针对以 cu 和 nvml 开头的函数进行拦截。
gpu memory 是怎么限制的?
首先是拦截 NVMLAPI 中的 _nvmlDeviceGetMemoryInfo,实现在执行 nvidia-smi 命令时只展示申请的 Memory(来源于 CUDA_DEVICE_MEMORY_LIMIT_X)。
然后是拦截内存分配相关的 CUDA API,比如:cuMemoryAllocate 和 cuMemAlloc_v2。
分配内存之前,增加了 oom_check,当前 Pod 的 GPU 内存使用量 超过 限制的内存使用量(来源于 CUDA_DEVICE_MEMORY_LIMIT_X)时直接返回 OOM。
gpu core 是怎么限制的?
同理,拦截提交 Kernel 相关的 CUDA API,例如:cuLaunchKernel。
提交 Kernel 之前,增加 rate_limit 逻辑,具体算法类似令牌桶,每次提交 kernel 都会消耗 Token,直到某次提交 kernel 发现没有 Token 时就会直接 sleep,一段时间之后 Token 恢复了,又可以继续提交任务了。
恢复 Token 时就会用到 CUDA_DEVICE_SM_LIMIT 环境变量。
1.ibvgpu.so 是怎么生效的
-
怎么被挂载进 Pod 的
-
怎么被使用上的
怎么被挂载进 Pod 的
这部分是 hami-device-plugin-nvidia 组件在处理,具体是 Allocate 方法,相关代码如下:
// pkg/device-plugin/nvidiadevice/nvinternal/plugin/server.go#L385
func (plugin *NvidiaDevicePlugin) Allocate(ctx context.Context, reqs *kubeletdevicepluginv1beta1.AllocateRequest) (*kubeletdevicepluginv1beta1.AllocateResponse, error) {
    klog.InfoS("Allocate", "request", reqs)
    responses := kubeletdevicepluginv1beta1.AllocateResponse{}
    nodename := os.Getenv(util.NodeNameEnvName)
    current, err := util.GetPendingPod(ctx, nodename)
    if err != nil {
        nodelock.ReleaseNodeLock(nodename, NodeLockNvidia)
        return &kubeletdevicepluginv1beta1.AllocateResponse{}, err
    }
    klog.V(5).Infof("allocate pod name is %s/%s, annotation is %+v", current.Namespace, current.Name, current.Annotations)

    for idx, req := range reqs.ContainerRequests {
        // If the devices being allocated are replicas, then (conditionally)
        // error out if more than one resource is being allocated.
        if strings.Contains(req.DevicesIDs[0], "MIG") {
            if plugin.config.Sharing.TimeSlicing.FailRequestsGreaterThanOne && rm.AnnotatedIDs(req.DevicesIDs).AnyHasAnnotations() {
                if len(req.DevicesIDs) > 1 {
                    return nil, fmt.Errorf("request for '%v: %v' too large: maximum request size for shared resources is 1", plugin.rm.Resource(), len(req.DevicesIDs))
                }
            }
            for _, id := range req.DevicesIDs {
                if !plugin.rm.Devices().Contains(id) {
                    return nil, fmt.Errorf("invalid allocation request for '%s': unknown device: %s", plugin.rm.Resource(), id)
                }
            }
            response, err := plugin.getAllocateResponse(req.DevicesIDs)
            if err != nil {
                return nil, fmt.Errorf("failed to get allocate response: %v", err)
            }
            responses.ContainerResponses = append(responses.ContainerResponses, response)
        } else {
            currentCtr, devreq, err := GetNextDeviceRequest(nvidia.NvidiaGPUDevice, *current)
            klog.Infoln("deviceAllocateFromAnnotation=", devreq)
            if err != nil {
                device.PodAllocationFailed(nodename, current, NodeLockNvidia)
                return &kubeletdevicepluginv1beta1.AllocateResponse{}, err
            }
            if len(devreq) != len(reqs.ContainerRequests[idx].DevicesIDs) {
                device.PodAllocationFailed(nodename, current, NodeLockNvidia)
                return &kubeletdevicepluginv1beta1.AllocateResponse{}, errors.New("device number not matched")
            }
            response, err := plugin.getAllocateResponse(plugin.GetContainerDeviceStrArray(devreq))
            if err != nil {
                return nil, fmt.Errorf("failed to get allocate response: %v", err)
            }

            err = EraseNextDeviceTypeFromAnnotation(nvidia.NvidiaGPUDevice, *current)
            if err != nil {
                device.PodAllocationFailed(nodename, current, NodeLockNvidia)
                return &kubeletdevicepluginv1beta1.AllocateResponse{}, err
            }

            if plugin.operatingMode != "mig" {
                for i, dev := range devreq {
                    limitKey := fmt.Sprintf("CUDA_DEVICE_MEMORY_LIMIT_%v", i)
                    response.Envs[limitKey] = fmt.Sprintf("%vm", dev.Usedmem)
                }
                response.Envs["CUDA_DEVICE_SM_LIMIT"] = fmt.Sprint(devreq[0].Usedcores)
                response.Envs["CUDA_DEVICE_MEMORY_SHARED_CACHE"] = fmt.Sprintf("%s/vgpu/%v.cache", hostHookPath, uuid.New().String())
                if plugin.schedulerConfig.DeviceMemoryScaling > 1 {
                    response.Envs["CUDA_OVERSUBSCRIBE"] = "true"
                }
                if plugin.schedulerConfig.DisableCoreLimit {
                    response.Envs[util.CoreLimitSwitch] = "disable"
                }
                cacheFileHostDirectory := fmt.Sprintf("%s/vgpu/containers/%s_%s", hostHookPath, current.UID, currentCtr.Name)
                os.RemoveAll(cacheFileHostDirectory)
                os.MkdirAll(cacheFileHostDirectory, 0777)
                os.Chmod(cacheFileHostDirectory, 0777)
                os.MkdirAll("/tmp/vgpulock", 0777)
                os.Chmod("/tmp/vgpulock", 0777)
                response.Mounts = append(response.Mounts,
                    &kubeletdevicepluginv1beta1.Mount{ContainerPath: fmt.Sprintf("%s/vgpu/libvgpu.so", hostHookPath),
                        HostPath: hostHookPath + "/vgpu/libvgpu.so",
                        ReadOnly: true},
                    &kubeletdevicepluginv1beta1.Mount{ContainerPath: fmt.Sprintf("%s/vgpu", hostHookPath),
                        HostPath: cacheFileHostDirectory,
                        ReadOnly: false},
                    &kubeletdevicepluginv1beta1.Mount{ContainerPath: "/tmp/vgpulock",
                        HostPath: "/tmp/vgpulock",
                        ReadOnly: false},
                )
                found := false
                for _, val := range currentCtr.Env {
                    if strings.Compare(val.Name, "CUDA_DISABLE_CONTROL") == 0 {
                        t, _ := strconv.ParseBool(val.Value)
                        if !t {
                            continue
                        }
                        found = true
                        break
                    }
                }
                if !found {
                    response.Mounts = append(response.Mounts, &kubeletdevicepluginv1beta1.Mount{ContainerPath: "/etc/ld.so.preload",
                        HostPath: hostHookPath + "/vgpu/ld.so.preload",
                        ReadOnly: true})
                }
                _, err = os.Stat(fmt.Sprintf("%s/vgpu/license", hostHookPath))
                if err == nil {
                    response.Mounts = append(response.Mounts, &kubeletdevicepluginv1beta1.Mount{
                        ContainerPath: "/tmp/license",
                        HostPath:      fmt.Sprintf("%s/vgpu/license", hostHookPath),
                        ReadOnly:      true,
                    })
                    response.Mounts = append(response.Mounts, &kubeletdevicepluginv1beta1.Mount{
                        ContainerPath: "/usr/bin/vgpuvalidator",
                        HostPath:      fmt.Sprintf("%s/vgpu/vgpuvalidator", hostHookPath),
                        ReadOnly:      true,
                    })
                }
            }
            responses.ContainerResponses = append(responses.ContainerResponses, response)
        }
    }
    klog.Infoln("Allocate Response", responses.ContainerResponses)
    device.PodAllocationTrySuccess(nodename, nvidia.NvidiaGPUDevice, NodeLockNvidia, current)
    return &responses, nil
}
核心部分:
response.Mounts = append(response.Mounts,
    &kubeletdevicepluginv1beta1.Mount{
        ContainerPath: fmt.Sprintf("%s/vgpu/libvgpu.so", hostHookPath),
        HostPath:      hostHookPath + "/vgpu/libvgpu.so",
        ReadOnly:      true,
    },
)
有一个挂载 libvgpu.so 的操作,使用的是 HostPath,来源于环境变量,HAMi 部署时默认用的/usr/local。
func init() {
    hostHookPath, _ = os.LookupEnv("HOOK_PATH")
}
怎么被加载上的
hami-device-plugin-nvidia Allocate 中还有这么一段逻辑:
found := false
for _, val := range currentCtr.Env {
    if strings.Compare(val.Name, "CUDA_DISABLE_CONTROL") == 0 {
        // 如果环境变量存在但为 false 或解析失败,则忽略
        t, _ := strconv.ParseBool(val.Value)
        if !t {
            continue
        }
        // 仅当环境变量存在且为 true 时标记为“found”
        found = true
        break
    }
}
if !found {
    response.Mounts = append(response.Mounts,
        &kubeletdevicepluginv1beta1.Mount{
            ContainerPath: "/etc/ld.so.preload",
            HostPath:      hostHookPath + "/vgpu/ld.so.preload",
            ReadOnly:      true,
        },
    )
}
当没有手动指定 CUDA_DISABLE_CONTROL=true 环境变量来关闭 HAMi 隔离时,就会挂载 宿主机上的/usr/local/vgpu/ld.so.preload 这个文件到 Pod 里的/etc/ld.so.preload。
在 Linux 系统中,/etc/ld.so.preload 是一个特殊的文件,系统会在加载共享库时,优先加载该文件中列出的共享库。这个文件通常用于强制加载特定的共享库,在系统启动或程序运行时覆盖默认的动态链接库行为。
Linux 下动态库加载顺序为:
LD_PRELOAD>LD_LIBRARY_PATH>/etc/ld.so.cache>/lib>/usr/lib.
通过 LD_PRELOAD 可以保证一定加载我们自定义的 libvgpu.so。
在宿主机上查看下这个文件中的内容:
root@j99cloudvm:~/lixd/hami# ls /usr/local/vgpu
containers  ld.so.preload  libvgpu.so

root@j99cloudvm:~/lixd/hami# cat /usr/local/vgpu/ld.so.preload
/usr/local/vgpu/libvgpu.so
里面的内容是/usr/local/vgpu/libvgpu.so,也就是通过该文件可以实现优先加载我们从外部挂载进去的 libvgpu.so。
一句话总结:通过 LD_PRELOAD 方式加载自己实现的 libvgpu.so。
core&memory 阈值
libvgpu.so 怎么指定要把 core、memory 限制在多少呢?
这部分也是 hami-device-plugin-nvidia Allocate 中实现的,Allocatte 中为 Pod 注入了相关环境变量:CUDA_DEVICE_MEMORY_LIMIT 和 CUDA_DEVICE_SM_LIMIT。
for i, dev := range devreq {
    limitKey := fmt.Sprintf("CUDA_DEVICE_MEMORY_LIMIT_%v", i)
    response.Envs[limitKey] = fmt.Sprintf("%vm", dev.Usedmem)
}
response.Envs["CUDA_DEVICE_SM_LIMIT"] = fmt.Sprint(devreq[0].Usedcores)
这样 libvgpu.so 就知道该限制在多少了。
小结
这一段分析了 libvgpu.so 是怎么生效的。
-
hami-device-plugin-nvidia 启动时将镜像中的 libvgpu.so 复制到宿主机,默认在 /usr/local/vgpu/libvgpu.so 位置。
-
Pod 创建时,hami-device-plugin-nvidia 中的 Allocate 方法使用 hostPath 将宿主机上的 /usr/local/vgpu/libvgpu.so 文件挂载到 Pod 里。
-
同时使用 /etc/ld.so.preload 实现优先加载上一步中挂载的 libvgpu.so 库,也是 Allocate 方法中将宿主机上的 /usr/local/vgpu/ld.so.preload 挂载到 Pod 里 /etc/ld.so.preload
至此,已经实现了在 Pod 中加载共享库时优先加载我们自定义的 libvgpu.so。
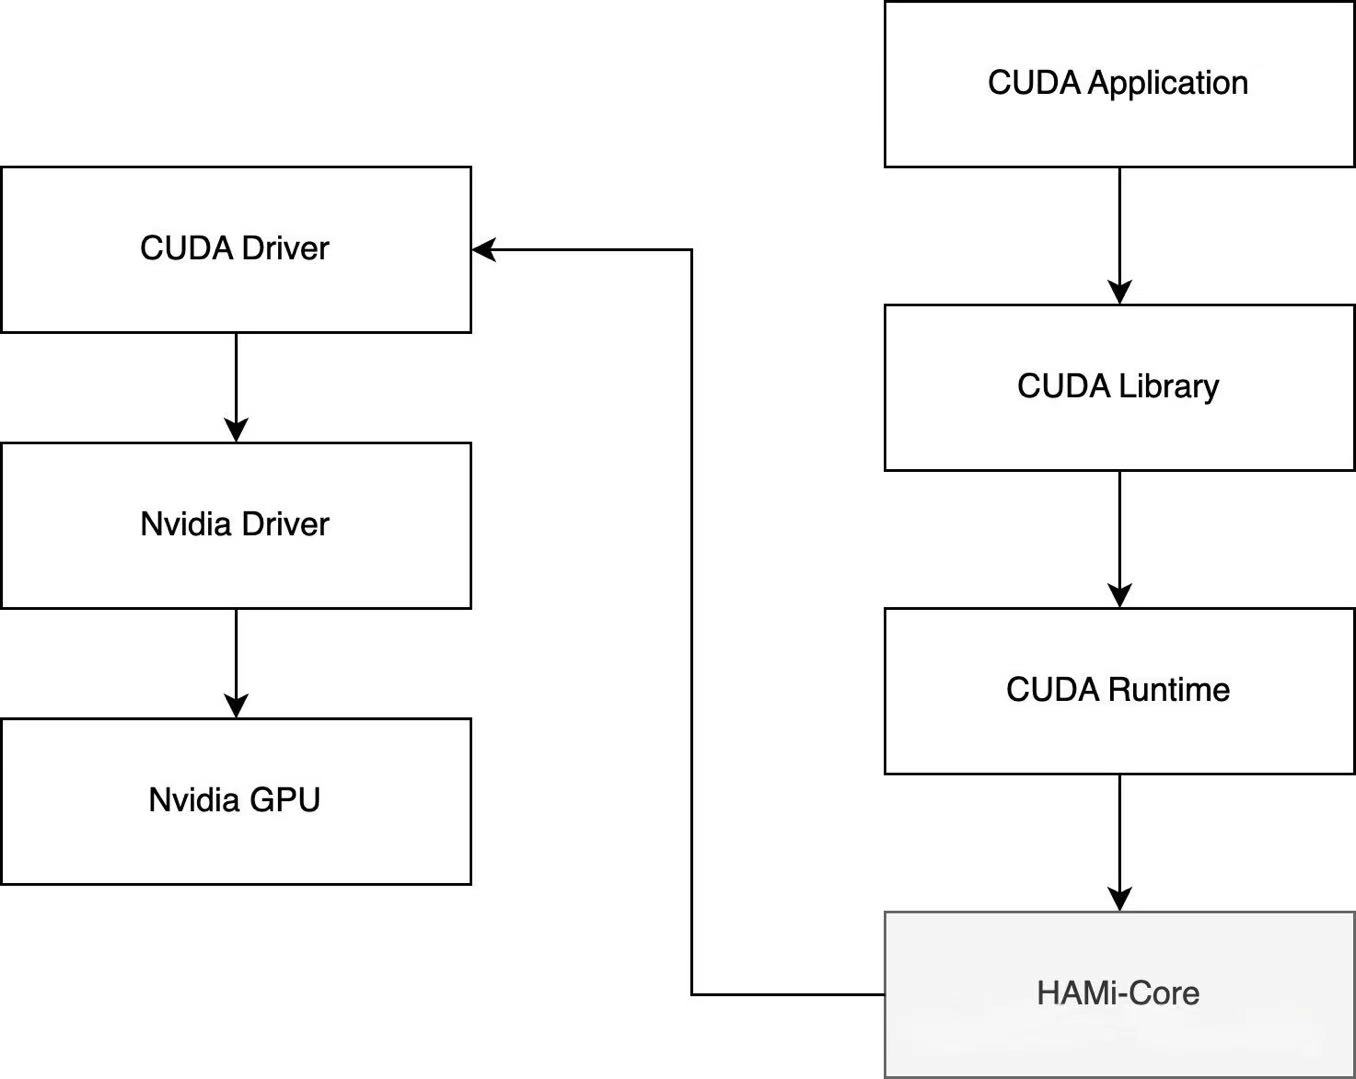
2. CUDA API 怎么拦截的
这部分则分析 HAMi-Core(libvgpu.so) 中怎么实现对 CUDA API 进行拦截的。
重写 dlsym 函数拦截 CUDA API
重写 dlsym 函数
dlsym 是一个用于符号解析的函数,声明在 dlfcn.h 头文件中,适用于 Linux 系统和其他符合 POSIX 标准的系统。它允许程序在运行时动态地加载和使用共享库中的符号。
HAMi-core 中重写了 dlsym 函数,以劫持 NVIDIA 动态链接库(如 CUDA 和 NVML)的调用,特别是针对以 cu 和 nvml 开头的函数进行拦截。
-
初始化 dlsym
-
如果以 cu 开头则特殊处理,使用 __dlsym_hook_section(handle, symbol)
-
如果以 nvml 开头也特殊处理,使用 __dlsym_hook_section_nvml(handle, symbol)
-
最后,如果前面都没找到则使用真正的 dlsym
完整代码如下:
// src/libvgpu.c#L77-L116
FUNC_ATTR_VISIBLE void* dlsym(void* handle, const char* symbol) {
    pthread_once(&dlsym_init_flag, init_dlsym);
    LOG_DEBUG("into dlsym %s", symbol);

    /* 1. 初始化 real_dlsym */
    if (real_dlsym == NULL) {
        real_dlsym = dlvsym(RTLD_NEXT, "dlsym", "GLIBC_2.2.5");
        if (real_dlsym == NULL) {
            real_dlsym = _dl_sym(RTLD_NEXT, "dlsym", dlsym);
            if (real_dlsym == NULL)
                LOG_ERROR("real dlsym not found");
        }
    }

    /* 处理 RTLD_NEXT */
    if (handle == RTLD_NEXT) {
        void* h = real_dlsym(RTLD_NEXT, symbol);
        int tid;
        pthread_mutex_lock(&dlsym_lock);
        tid = pthread_self();
        if (check_dlmap(tid, h)) {
            LOG_WARN("recursive dlsym : %s\n", symbol);
            h = NULL;
        }
        pthread_mutex_unlock(&dlsym_lock);
        return h;
    }

    /* 2. cu* 符号特殊处理 */
    if (symbol[0] == 'c' && symbol[1] == 'u') {
        pthread_once(&pre_cuinit_flag, (void(*)(void))preInit);
        void* f = __dlsym_hook_section(handle, symbol);
        if (f != NULL)
            return f;
    }

    /* 3. nvml* 符号特殊处理 */
#ifdef HOOK_NVML_ENABLE
    if (symbol[0] == 'n' && symbol[1] == 'v' && symbol[2] == 'm' && symbol[3] == 'l') {
        void* f = __dlsym_hook_section_nvml(handle, symbol);
        if (f != NULL)
            return f;
    }
#endif

    /* 4. 其余符号走原 dlsym */
    return real_dlsym(handle, symbol);
}
cu 函数处理:__dlsym_hook_section
__dlsym_hook_section 定义了对于 cu 开头的符号,该怎么处理,具体如下:
__dlsym_hook_section_nvml 也是类似的,就不赘述了。
void* __dlsym_hook_section(void* handle, const char* symbol) {
    int it;

    /* 1. 判断 symbol 是否在待拦截 CUDA API 列表中 */
    for (it = 0; it < CUDA_ENTRY_END; it++) {
        if (strcmp(cuda_library_entry[it].name, symbol) == 0) {
            if (cuda_library_entry[it].fn_ptr == NULL) {
                LOG_WARN("NEED TO RETURN NULL");
                return NULL;
            } else {
                break;
            }
        }
    }

    /* 2. 通过宏定义填充被 hook 的函数指针 */
    /* Context */
    DLSYM_HOOK_FUNC(cuCtxGetDevice);
    DLSYM_HOOK_FUNC(cuCtxCreate);
    /* ... */
    DLSYM_HOOK_FUNC(cuGraphDestroy);

#ifdef HOOK_MEMINFO_ENABLE
    DLSYM_HOOK_FUNC(cuMemGetInfo_v2);
#endif

    /* 3. 未命中则返回 NULL */
    return NULL;
}
-
先判断该 symbol 是否在待拦截的 CUDA API 列表中,如果存在则跳出循环执行后续逻辑,不存在直接返回 NULL
-
一系列 DLSYM_HOOK_FUNC 宏定义调用,核心就在这里
-
最后,如果没找到也返回 NULL
核心逻辑在 DLSYM_HOOK_FUNC 中,接下来看下 DLSYM_HOOK_FUNC 宏定义。
宏定义 DLSYM_HOOK_FUNC
DLSYM_HOOK_FUNC 的定义如下:
#if defined(DLSYM_HOOK_DEBUG)
#define DLSYM_HOOK_FUNC(f)                                           \
    if (0 == strcmp(symbol, #f)) {                                   \
        LOG_DEBUG("Detect dlsym for %s\n", #f);                      \
        return (void*) f; }                                          \

#else

#define DLSYM_HOOK_FUNC(f)                                           \
    if (0 == strcmp(symbol, #f)) {                                   \
        return (void*) f; }                                          \

#endif
-
#f:这是宏中预处理器的一个特殊操作符,它将传入的参数 f 转换为字符串文字。例如,#f 将 cuGraphDestroy 转换成字符串 "cuGraphDestroy"。
-
strcmp(symbol, #f):strcmp 是一个比较两个字符串的函数。如果 symbol 与 #f 字符串匹配(即 symbol 的值为 "cuGraphDestroy"),则 strcmp 返回 0。
-
return (void) f;**:如果 strcmp 返回 0,即 symbol 等于 f,则返回 f 对应的函数指针。(void) f 将函数指针强制转换为 void* 类型,表示返回一个通用的函数指针。
举个例子:
DLSYM_HOOK_FUNC(cuGraphDestroy); 会被展开为下面这样:
if (0 == strcmp(symbol, "cuGraphDestroy")) {
    return (void*) cuGraphDestroy;
}
小结
至此,逻辑就比较清楚了,重写 dlsym 函数,对于 cu 和 nvml 开头的特殊处理。
以 cuGraphDestroy 为例
-
如果 symbol 在待拦截的 CUDA API 列表里,就根据名称匹配,返回对应的地址
-
如果不在列表里,就直接返回 NULl
hook.c
主要通过 dlopen 和 dlsym 函数加载 CUDA 库,并重定向 CUDA 库中的函数调用,以实现拦截、监控或修改 CUDA 函数的行为。
待拦截 CUDA API 列表
首先是通过 cuda_library_entry 定义了哪些 CUDA 函数需要进行拦截,具体要拦截的 CUDA API 列表如下:
// src/cuda/hook.c#L8-L219
cuda_entry_t cuda_library_entry[] = {
    /* Init Part    */
    {.name = "cuInit"},
    /* Device Part */
    {.name = "cuDeviceGetAttribute"},
    /* .... */
    /* Context Part */
    {.name = "cuDevicePrimaryCtxGetState"},

    /* cuda 11.7 external resource interoperability */
    {.name = "cuImportExternalMemory"},
    /* Graph part */
    {.name = "cuGraphCreate"},
    {.name = "cuGraphDestroy"},

    {.name = "cuGetProcAddress"},
    {.name = "cuGetProcAddress_v2"},
};
加载 CUDA API 地址
然后则是使用 load_cuda_libraries 函数获取各个 CUDA 函数的地址:
-
通过 dlopen 打开共享库 libcuda.so.1
-
然后通过 real_dlsym 根据函数名称查询到对应的地址并存储到前面创建的 cuda_library_entry 中
void load_cuda_libraries() {
    void *table = NULL;
    int i = 0;
    char cuda_filename[FILENAME_MAX];
    char tmpfunc[500];

    LOG_INFO("Start hijacking");

    snprintf(cuda_filename, FILENAME_MAX - 1, "%s", "libcuda.so.1");
    cuda_filename[FILENAME_MAX - 1] = '\0';

    table = dlopen(cuda_filename, RTLD_NOW | RTLD_NODELETE);
    if (!table) {
        LOG_WARN("can't find library %s", cuda_filename);
    }

    for (i = 0; i < CUDA_ENTRY_END; i++) {
        LOG_DEBUG("LOADING %s %d", cuda_library_entry[i].name, i);
        cuda_library_entry[i].fn_ptr = real_dlsym(table, cuda_library_entry[i].name);
        if (!cuda_library_entry[i].fn_ptr) {
            cuda_library_entry[i].fn_ptr = real_dlsym(RTLD_NEXT, cuda_library_entry[i].name);
            if (!cuda_library_entry[i].fn_ptr) {
                LOG_INFO("can't find function %s in %s", cuda_library_entry[i].name, cuda_filename);
                memset(tmpfunc, 0, 500);
                strcpy(tmpfunc, cuda_library_entry[i].name);
                while (prior_function(tmpfunc)) {
                    cuda_library_entry[i].fn_ptr = real_dlsym(RTLD_NEXT, tmpfunc);
                    if (cuda_library_entry[i].fn_ptr) {
                        LOG_INFO("found prior function %s", tmpfunc);
                        break;
                    }
                }
            }
        }
    }
    LOG_INFO("loaded_cuda_libraries");
    if (cuda_library_entry[0].fn_ptr == NULL) {
        LOG_WARN("is NULL");
    }
    dlclose(table);
}
libcuda_hook.h
src/include/libcuda_hook.h 里面则是上一步拿到的 CUDA 函数的真正拦截实现。
src/include/libnvml_hook.h 则是对 NVML 库的拦截,类似的,就不在赘述。
这个代码片段定义了一个用于拦截 CUDA 函数调用的机制,它的基本原理是通过函数指针重定向 CUDA 函数调用,从而实现对 CUDA 函数的拦截和替换。
原始 CUDA 函数表cuda_entry_t 就是 hook.c 中得到的:
typedef struct {
    void *fn_ptr;
    char *name;
} cuda_entry_t;
这个结构体 cuda_entry_t 保存了 CUDA 函数的指针 (fn_ptr) 和函数名 (name)。通过将所有要拦截的 CUDA 函数存储在一个数组中,程序可以动态找到并调用这些函数。
函数枚举
typedef enum {
    CUDA_OVERRIDE_ENUM(cuInit),
    // ... 其他 CUDA 函数
    CUDA_OVERRIDE_ENUM(cuGraphInstantiate),
    CUDA_ENTRY_END
} cuda_override_enum_t;
cuda_override_enum_t 枚举了所有要拦截的 CUDA 函数。每个 CUDA 函数都有一个对应的枚举值,通过这个枚举可以索引到函数指针表中的具体函数。
宏定义:CUDA_OVERRIDE_ENUM
#define CUDA_OVERRIDE_ENUM(x) OVERRIDE_##x
这个宏的作用是将 x 前面加上 OVERRIDE_ 前缀。
具体来说,如果你传入 cuInit,它就会转换成 OVERRIDE_cuInit。
宏定义:CUDA_OVERRIDE_CALL
函数调用重定向 CUDA_OVERRIDE_CALL
这里就是具体的 Hijacking 逻辑,这里看起来没有啥逻辑,就是加了一个日志打印
#define CUDA_OVERRIDE_CALL(table, sym, ...)          \
    ({                                               \
        LOG_DEBUG("Hijacking %s", #sym);             \
        cuda_sym_t _entry =                          \
            (cuda_sym_t)CUDA_FIND_ENTRY(table, sym); \
        _entry(__VA_ARGS__);                         \
    })

#define CUDA_FIND_ENTRY(table, sym) \
    ((table)[CUDA_OVERRIDE_ENUM(sym)].fn_ptr)
CUDA_OVERRIDE_CALL 宏通过函数表中的函数指针来重定向 CUDA 函数调用:
-
CUDA_FIND_ENTRY 会根据传入的 sym(函数枚举)从 table 中找到对应的函数指针。
-
cuda_sym_t 定义为一个函数指针类型,用于调用 CUDA 函数。
-
_entry(VA_ARGS) 实际上就是调用找到的 CUDA 函数,并传入参数。
这个宏在每次调用时都会输出日志,例如 LOG_DEBUG("Hijacking %s", #sym) 表示拦截了某个函数。
就是根据函数枚举值,在 cuda_library_entry 中找到具体的函数地址,然后进行调用。
CUDA_FIND_ENTRY 则在 table 根据名称查询对应的函数地址。
小结
这部分分享了 HAMi-Core(libvgu.so) 是如何对 CUDA API 进行拦截的。
核心是通过重新 dlsym 函数,替换函数地址实现。
3.gpu memory 是怎么限制的
这部分分析 HAMi-Core 怎么实现 memory limit 的。
这里分为两部分:
-
NVML 拦截:在 Pod 中执行 nvidia-smi 命令查看设备信息时,Memory 部分只会展示申请的值,而不是当前设备真实内存,这部分则是通过拦截 NVML API 实现。
-
CUDA API 拦截:第二部分则是真正申请 Memory 时,会限制不能超过 Limit 的内存。
NVML
当我们申请 3000M 内存时,Pod 中执行 nvidia-smi 看到的就是 3000M:
resources:
  limits:
    nvidia.com/gpu: 1          # declare how many physical GPUs the pod needs
    nvidia.com/gpumem: 3000    # identifies 3G GPU memory each physical GPU allocates to the pod
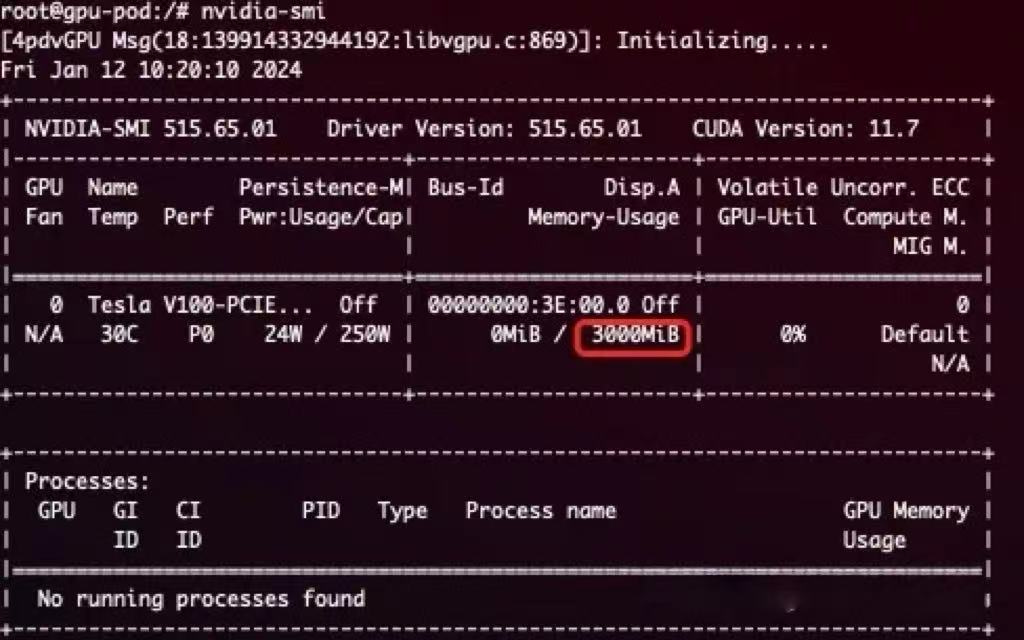
具体怎么实现的呢?其实是拦截的 NVML 中的 _nvmlDeviceGetMemoryInfo API。
_nvmlDeviceGetMemoryInfo
具体实现如下:
// src/nvml/hook.c#L316
nvmlReturn_t _nvmlDeviceGetMemoryInfo(nvmlDevice_t device, nvmlMemory_t* memory, int version) {
    unsigned int dev_id;
    LOG_DEBUG("into nvmlDeviceGetMemoryInfo");

    switch (version) {
    case 1:
        CHECK_NVML_API(NVML_OVERRIDE_CALL(nvml_library_entry, nvmlDeviceGetMemoryInfo, device, memory));
        break;
    case 2:
        CHECK_NVML_API(NVML_OVERRIDE_CALL(nvml_library_entry, nvmlDeviceGetMemoryInfo_v2, device,
                                          (nvmlMemory_v2_t *)memory));
    }

    LOG_DEBUG("origin_free=%lld total=%lld", memory->free, memory->total);
    CHECK_NVML_API(nvmlDeviceGetIndex(device, &dev_id));
    int cudadev = nvml_to_cuda_map(dev_id);
    if (cudadev < 0)
        return NVML_SUCCESS;

    size_t usage  = get_current_device_memory_usage(cudadev);
    size_t monitor = get_current_device_memory_monitor(cudadev);
    size_t limit  = get_current_device_memory_limit(cudadev);
    LOG_DEBUG("usage=%zu limit=%zu monitor=%zu", usage, limit, monitor);

    if (memory == NULL)
        return NVML_SUCCESS;

    if (limit == 0) {
        switch (version) {
        case 1:
            memory->used = usage;
            return NVML_SUCCESS;
        case 2:
            ((nvmlMemory_v2_t *)memory)->used = usage;
            return NVML_SUCCESS;
        }
    } else {
        switch (version) {
        case 1:
            memory->free  = limit - usage;
            memory->total = limit;
            memory->used  = usage;
            return NVML_SUCCESS;
        case 2:
            ((nvmlMemory_v2_t *)memory)->free  = limit - usage;
            ((nvmlMemory_v2_t *)memory)->total = limit;
            ((nvmlMemory_v2_t *)memory)->used  = usage;
            return NVML_SUCCESS;
        }
    }

    return NVML_SUCCESS;
}
核心部分
size_t usage  = get_current_device_memory_usage(cudadev);
size_t monitor = get_current_device_memory_monitor(cudadev);
size_t limit   = get_current_device_memory_limit(cudadev);
LOG_DEBUG("usage=%zu limit=%zu monitor=%zu", usage, limit, monitor);
Limit 就是总量,也就是前面展示的 3000M,看下 get_current_device_memory_limit 怎么实现的
get_current_device_memory_limit
uint64_t get_current_device_memory_limit(const int dev) {
    ensure_initialized();
    if (dev < 0 || dev >= CUDA_DEVICE_MAX_COUNT) {
        LOG_ERROR("Illegal device id: %d", dev);
    }
    return region_info.shared_region->limit[dev];
}
也是很简单,就是直接返回了,看下 region_info 这个信息是怎么获取的
do_init_device_memory_limits
void do_init_device_memory_limits(uint64_t* arr, int len) {
    size_t fallback_limit = get_limit_from_env(CUDA_DEVICE_MEMORY_LIMIT);
    int i;
    for (i = 0; i < len; ++i) {
        char env_name[CUDA_DEVICE_MEMORY_LIMIT_KEY_LENGTH] = CUDA_DEVICE_MEMORY_LIMIT;
        char index_name[8];
        snprintf(index_name, 8, "_%d", i);
        strcat(env_name, index_name);
        size_t cur_limit = get_limit_from_env(env_name);
        if (cur_limit > 0) {
            arr[i] = cur_limit;
        } else if (fallback_limit > 0) {
            arr[i] = fallback_limit;
        } else {
            arr[i] = 0;
        }
    }
}
可以看到,是从 CUDA_DEVICE_MEMORY_LIMIT_X 环境变量中读取到的。
也就是用户申请的 nvidia.com/gpumem
具体调用的地方在 initialized 函数里:
// multiprocess_memory_limit.c#L780
void initialized() {
    pthread_mutex_init(&_kernel_mutex, NULL);
    char* _record_kernel_interval_env = getenv("RECORD_KERNEL_INTERVAL");
    if (_record_kernel_interval_env) {
        _record_kernel_interval = atoi(_record_kernel_interval_env);
    }
    try_create_shrreg();
    init_proc_slot_withlock();
}

// multiprocess_memory_limit.c#L669
void try_create_shrreg() {
    LOG_DEBUG("Try create shrreg")
    if (region_info.fd == -1) {
        /* 使用 .fd 标记 fork 后是否需要重新初始化
         * fork 后无需再次注册 exit 处理函数 */
        if (0 != atexit(exit_handler)) {
            LOG_ERROR("Register exit handler failed: %d", errno);
        }
    }

    /* 初始化 limit 数组 */
    do_init_device_memory_limits(region->limit, CUDA_DEVICE_MAX_COUNT);

    LOG_DEBUG("shrreg created");
}
至此,NVML 部分就分析完了~,接下来分析下 CUDA API 是怎么实现 Memory Limit 的。
CUDA
cuMemAlloc_v2
HAMi-Core 对相关方法都做了重新实现,比如:
// src/cuda/memory.c#L129-L145
CUresult cuMemoryAllocate(CUdeviceptr* dptr, size_t bytesize,
                          size_t* bytesallocated, void* data) {
    CUresult res;
    if (bytesallocated != NULL)
        *bytesallocated = bytesize;

    res = CUDA_OVERRIDE_CALL(cuda_library_entry, cuMemAlloc_v2, dptr, bytesize);
    return res;
}

CUresult cuMemAlloc_v2(CUdeviceptr* dptr, size_t bytesize) {
    LOG_INFO("into cuMemAlloc_v2 dptr=%p bytesize=%zu", dptr, bytesize);

    ENSURE_RUNNING();
    CUresult res = allocate_raw(dptr, bytesize);
    if (res != CUDA_SUCCESS)
        return res;

    LOG_INFO("cuMemAlloc_v2 success dptr=%p bytesize=%zu", (void*)*dptr, bytesize);
    return CUDA_SUCCESS;
}
cuMemoryAllocate 和 cuMemAlloc_v2 都是 CUDA 中用于在 GPU 上分配内存,内部也是调用了 allocate_raw,继续追一下。
add_chunk
allocate_raw 实现如下:
// src/allocator/allocator.c#L184-L190
int allocate_raw(CUdeviceptr *dptr, size_t size) {
    int tmp;
    pthread_mutex_lock(&mutex);
    tmp = add_chunk(dptr, size);
    pthread_mutex_unlock(&mutex);
    return tmp;
}
内部也调用了 add_chunk:
// src/allocator/allocator.c#L131-L151
int add_chunk(CUdeviceptr *address, size_t size) {
    size_t addr = 0;
    size_t allocsize;
    CUresult res = CUDA_SUCCESS;
    CUdevice dev;
    cuCtxGetDevice(&dev);

    if (oom_check(dev, size))
        return -1;

    allocated_list_entry *e;
    INIT_ALLOCATED_LIST_ENTRY(e, addr, size);

    if (size <= IPCSIZE) {
        res = CUDA_OVERRIDE_CALL(cuda_library_entry,
                                 cuMemAlloc_v2,
                                 &e->entry->address,
                                 size);
    } else {
        e->entry->length = size;
        res = cuMemoryAllocate(&e->entry->address,
                               size,
                               &e->entry->length,
                               e->entry->allocHandle);
    }

    if (res != CUDA_SUCCESS) {
        LOG_ERROR("cuMemoryAllocate failed res=%d", res);
        return res;
    }

    LIST_ADD(device_overallocated, e);

    *address = e->entry->address;
    allocsize = size;
    cuCtxGetDevice(&dev);
    add_gpu_device_memory_usage(getpid(), dev, allocsize, 2);
    return 0;
}
其中有一个自定义的校验逻辑:
if oom_check(dev, size) {
    return -1
}
oom_check
oom_check 实现:
int oom_check(const int dev, size_t addon) {
    int count1 = 0;
    CUDA_OVERRIDE_CALL(cuda_library_entry, cuDeviceGetCount, &count1);
    CUdevice d;
    if (dev == -1)
        cuCtxGetDevice(&d);
    else
        d = dev;

    uint64_t limit = get_current_device_memory_limit(d);
    size_t _usage = get_gpu_memory_usage(d);

    if (limit == 0) {
        return 0;
    }

    size_t new_allocated = _usage + addon;
    LOG_INFO("_usage=%zu limit=%zu new_allocated=%zu", _usage, limit, new_allocated);
    if (new_allocated > limit) {
        LOG_ERROR("Device %d OOM %zu / %zu", d, new_allocated, limit);

        if (rm_quitted_process() > 0)
            return oom_check(dev, addon);
        return 1;
    }
    return 0;
}
核心部分逻辑
if (new_allocated > limit) {
    LOG_ERROR("Device %d OOM %zu / %zu", d, new_allocated, limit);

    if (rm_quitted_process() > 0)
        return oom_check(dev, addon);
    return 1;
}
新分配内存如果超过了限制,会进行一次清理,如果清理之后还是内存不够,就直接返回 1,配合前面的 if
if (oom_check(dev, size))
    return -1;
最终返回 -1,表示 OOM。
这样就实现了 Memory Limit。
4. gpu core 是怎么限制的
这部分分析 HAMi-Core 是怎么实现 core limi 的。
什么是 Kernel
在此之前,先简单解释一下什么是 Kernel。
在 CUDA 编程中,Kernel 是在 GPU 上并行执行的函数,开发人员编写 Kernel 来描述并行计算任务,然后在主机上调用 Kernel 来在 GPU 上执行计算。
在 CUDA 程序架构中,host 代码部分在 CPU 上执行,是普通的 C 代码。当遇到数据并行处理的部分,CUDA 会将程序编译成 GPU 能执行的程序,并传送到 GPU,这个程序在 CUDA 里称做核 (kernel)。device 代码部分在 GPU 上执行,此代码部分在 kernel 上编写 (.cu 文件)。
使用 GPU 真正产生利用率是向 GPU 提交了一个一个的计算任务,可能是矩阵乘法、卷积操作、向量加法等任何并行计算任务,也就是前面提到的 kernel,这个提交的过程被称为 kernel launch。
HAMi-Core 中就是通过限制 kernel 的提交来实现 core limit,具体算法类似令牌桶,每次提交 kernel 都会消耗 Token,当某次提交 kernel 发现没有 Token 时就会直接 sleep,sleep 恢复后又分配一些 Token。
cuLaunchKernel
cuLaunchKernel 是 CUDA 的一个 API,用于启动一个 CUDA 核函数(kernel)。HAMi-Core 自定义的 cuLaunchKernel 方法中增加了 rate_limiter 逻辑,用来实现 core limit。
// src/cuda/memory.c#L542-L551
CUresult cuLaunchKernel(CUfunction f,
                        unsigned int gridDimX, unsigned int gridDimY, unsigned int gridDimZ,
                        unsigned int blockDimX, unsigned int blockDimY, unsigned int blockDimZ,
                        unsigned int sharedMemBytes, CUstream hStream,
                        void** kernelParams, void** extra) {
    ENSURE_RUNNING();
    pre_launch_kernel();
    if (pidfound == 1) {
        rate_limiter(gridDimX * gridDimY * gridDimZ,
                     blockDimX * blockDimY * blockDimZ);
    }
    CUresult res = CUDA_OVERRIDE_CALL(cuda_library_entry,
                                      cuLaunchKernel,
                                      f,
                                      gridDimX, gridDimY, gridDimZ,
                                      blockDimX, blockDimY, blockDimZ,
                                      sharedMemBytes, hStream,
                                      kernelParams, extra);
    return res;
}
核心逻辑:rate_limiter
然后 rate_limiter 则是根据当前的使用情况和从环境变量中获取到的 limit 限制进行比较。
每次提交 kernel 都会减少 g_cur_cuda_cores,小于 0 时就会被 block (nanosleep),然后到下一个时间片的时候 g_cur_cuda_cores 又会恢复。
// src/multiprocess_utilization_watcher.c#L34
void rate_limiter(int grids, int blocks) {
    int before_cuda_cores = 0;
    int after_cuda_cores = 0;
    int kernel_size = grids;

    while (get_recent_kernel() < 0) {
        sleep(1);
    }
    set_recent_kernel(2);

    if ((get_current_device_sm_limit(0) >= 100) || (get_current_device_sm_limit(0) == 0))
        return;

    if (get_utilization_switch() == 0)
        return;

    LOG_DEBUG("grid: %d, blocks: %d", grids, blocks);
    LOG_DEBUG("launch kernel %d, curr core: %d", kernel_size, g_cur_cuda_cores);

    do {
CHECK:
        before_cuda_cores = g_cur_cuda_cores;
        LOG_DEBUG("current core: %d", g_cur_cuda_cores);
        if (before_cuda_cores < 0) {
            nanosleep(&g_cycle, NULL);
            goto CHECK;
        }
        after_cuda_cores = before_cuda_cores - kernel_size;
    } while (!CAS(&g_cur_cuda_cores, before_cuda_cores, after_cuda_cores));
}
当前 SM_LIMIT 限制大于等于 100 或者等于 0 就直接返回,没必要在判断要不要限制了。
if ((get_current_device_sm_limit(0) >= 100) || (get_current_device_sm_limit(0) == 0))
    return;
获取限制配置:do_init_device_sm_limits
Limit 的限制从 CUDA_DEVICE_SM_LIMIT 环境变量获取,然后初始化到一个数组里。
// src/multiprocess/multiprocess_memory_limit.c#L179
void do_init_device_sm_limits(uint64_t *arr, int len) {
    size_t fallback_limit = get_limit_from_env(CUDA_DEVICE_SM_LIMIT);
    if (fallback_limit == 0) fallback_limit = 100;
    int i;
    for (i = 0; i < len; ++i) {
        char env_name[CUDA_DEVICE_SM_LIMIT_KEY_LENGTH] = CUDA_DEVICE_SM_LIMIT;
        char index_name[8];
        snprintf(index_name, 8, "_%d", i);
        strcat(env_name, index_name);
        size_t cur_limit = get_limit_from_env(env_name);
        if (cur_limit > 0) {
            arr[i] = cur_limit;
        } else if (fallback_limit > 0) {
            arr[i] = fallback_limit;
        } else {
            arr[i] = 0;
        }
    }
}
核心 Limit 逻辑
真正的 Limit 逻辑如下,逻辑还是比较简单,有注释应该能看明白。
do {
CHECK:
    // 先是创建局部变量 before_cuda_cores,值和当前的 g_cur_cuda_cores 一样
    before_cuda_cores = g_cur_cuda_cores;
    LOG_DEBUG("current core: %d", g_cur_cuda_cores);
    // 然后判断 before_cuda_cores<0
    if (before_cuda_cores < 0) {
        // 小于 0 则说明当前已经没有 Token 了,就 sleep 一会
        nanosleep(&g_cycle, NULL);
        // sleep 结束后通过 goto 跳转回去继续 check
        goto CHECK;
    }
    // 如果大于等于 0 都不做限制,使用当前 Token 减去要提交的任务消耗的 Token 数
    after_cuda_cores = before_cuda_cores - kernel_size;
    // 最后则通过 CAS 把 after_cuda_cores 的值赋给 g_cur_cuda_cores
} while (!CAS(&g_cur_cuda_cores, before_cuda_cores, after_cuda_cores));
这里用得 do while + cas(Compare And Swap) 来保证,对 Token 的更新一定会成功。
CAS(&g_cur_cuda_cores, before_cuda_cores, after_cuda_cores)
-
如果 g_cur_cuda_cores 和 before_cuda_cores 值一样,就把 after_cuda_cores 赋值给 g_cur_cuda_cores。
-
如果 g_cur_cuda_cores 和 before_cuda_cores 值一样说明就没有其他地方更新 g_cur_cuda_cores,因此这里可以放心更新。
CAS 执行成功返回 true,失败则返回 false,这里使用 !CAS 作为 While 条件,也就是如果更新失败了就会一直重复循环。
还有两个问题:
-
nanosleep(&g_cycle, NULL); 会 sleep 多久
-
还有什么地方在给 g_cur_cuda_cores 赋值,即:增加 Token 的逻辑在哪里
先看第一个:nanosleep(&g_cycle, NULL); 会 sleep 多久,g_cycle 定义如下:
// src/multiprocess/multiprocess_utilization_watcher.h
#define MAX_PIDS 1024

#define CAS(ptr, old, new) __sync_bool_compare_and_swap((ptr), (old), (new))

#define MILLISEC (1000UL * 1000UL)

#define TIME_TICK (10)

static const struct timespec g_cycle = {
    .tv_sec = 0,
    .tv_nsec = TIME_TICK * MILLISEC,
};

static const struct timespec g_wait = {
    .tv_sec = 0,
    .tv_nsec = 120 * MILLISEC,
};
算起来就是 10 1000 1000 纳秒,即使 10 毫秒,也就是每次 Token 不足时会 sleep 10 毫秒,之后再次判断。
接下来是第二个问题:还有什么地方在给 g_cur_cuda_cores 赋值,即:增加 Token 的逻辑在哪里?
Token 恢复逻辑
change_token
有一个 change_token 的方法在增加 Token
// src/multiprocess/multiprocess_utilization_watcher.c#L63
static void change_token(int delta) {
    int cuda_cores_before = 0, cuda_cores_after = 0;

    LOG_DEBUG("delta: %d, curr: %d", delta, g_cur_cuda_cores);
    do {
        cuda_cores_before = g_cur_cuda_cores;
        cuda_cores_after = cuda_cores_before + delta;

        if (cuda_cores_after > g_total_cuda_cores) {
            cuda_cores_after = g_total_cuda_cores;
        }
    } while (!CAS(&g_cur_cuda_cores, cuda_cores_before, cuda_cores_after));
}
utilization_watcher
调用逻辑在 utilization_watcher 里,是一个死循环,一直在获取当前的 gpu 使用情况。
// src/multiprocess/multiprocess_utilization_watcher.c#L190
void* utilization_watcher() {
    nvmlInit();
    int userutil[CUDA_DEVICE_MAX_COUNT];
    int sysprocnum;
    int share = 0;
    int upper_limit = get_current_device_sm_limit(0);
    LOG_DEBUG("upper_limit=%d\n", upper_limit);

    while (1) {
        nanosleep(&g_wait, NULL);

        if (pidfound == 0) {
            update_host_pid();
            if (pidfound == 0)
                continue;
        }

        init_gpu_device_sm_utilization();
        get_used_gpu_utilization(userutil, &sysprocnum);

        if ((share == g_total_cuda_cores) && (g_cur_cuda_cores < 0)) {
            g_total_cuda_cores *= 2;
            share = g_total_cuda_cores;
        }

        share = delta(upper_limit, userutil[0], share);
        LOG_DEBUG("userutil=%d currentcores=%d total=%d limit=%d share=%d\n",
                  userutil[0], g_cur_cuda_cores, g_total_cuda_cores, upper_limit, share);
        change_token(share);
    }
}
一共做了几个事情:
-
初始化并获取当前 GPU 使用率
-
根据限制值和当前使用情况计算本轮可以增加的 Token,然后调用 change_token 增加 Token
初始化并获取当前 GPU 使用率
比较重要的是下面这个 upper_limit,也就是用户申请的 GPU Core,具体实现和前面分析的 Memory Limit 类似,这里就不再赘述了,也是从 CUDA_DEVICE_SM_LIMIT 环境变量中获取到的即可。
int upper_limit = get_current_device_sm_limit(0);
初始化如下:
int init_gpu_device_sm_utilization() {
    int i, dev;
    ensure_initialized();
    lock_shrreg();
    for (i = 0; i < region_info.shared_region->proc_num; i++) {
        for (dev = 0; dev < CUDA_DEVICE_MAX_COUNT; dev++) {
            region_info.shared_region->procs[i].device_util[dev].sm_util = 0;
            break;
        }
    }
    unlock_shrreg();
    return 1;
}
然后获取当前使用率
int get_used_gpu_utilization(int *userutil, int *sysprocnum) {
    struct timeval cur;
    size_t microsec;

    int i, sum = 0;
    unsigned int infcount;
    size_t summonitor = 0;
    nvmlProcessInfo_v1_t infos[SHARED_REGION_MAX_PROCESS_NUM];

    unsigned int nvmlCounts;
    CHECK_NVML_API(nvmlDeviceGetCount(&nvmlCounts));

    int devi, cudadev;
    for (devi = 0; devi < nvmlCounts; devi++) {
        sum = 0;
        summonitor = 0;
        shrreg_proc_slot_t *proc;
        cudadev = nvml_to_cuda_map((unsigned int)(devi));
        if (cudadev < 0)
            continue;
        nvmlDevice_t device;
        char uuid[NVML_DEVICE_UUID_BUFFER_SIZE];
        CHECK_NVML_API(nvmlDeviceGetHandleByIndex(cudadev, &device));
        CHECK_NVML_API(nvmlDeviceGetUUID(device, uuid, NVML_DEVICE_UUID_BUFFER_SIZE));
        nvmlReturn_t res = nvmlDeviceGetComputeRunningProcesses(device, &infcount, infos);
        if (res == NVML_ERROR_INSUFFICIENT_SIZE) {
            continue;
        }
        gettimeofday(&cur, NULL);
        microsec = (cur.tv_sec - 1) * 1000UL * 1000UL + cur.tv_usec;
        nvmlProcessUtilizationSample_t processes_sample[SHARED_REGION_MAX_PROCESS_NUM];
        unsigned int processes_num = SHARED_REGION_MAX_PROCESS_NUM;
        res = nvmlDeviceGetProcessUtilization(device, processes_sample, &processes_num, microsec);
        LOG_DEBUG("processes_num=%d\n", processes_num);
        LOG_DEBUG("Device UUID: %s\n", uuid);
        if (res == NVML_ERROR_INSUFFICIENT_SIZE) {
            userutil[cudadev] = 0;
            for (i = 0; i < infcount; i++) {
                proc = find_proc_by_hostpid(infos[i].pid);
                if (proc != NULL) {
                    LOG_DEBUG("pid=%u monitor=%lld\n", infos[i].pid, infos[i].usedGpuMemory);
                    summonitor += infos[i].usedGpuMemory;
                }
                set_gpu_device_memory_monitor(infos[i].pid, cudadev, summonitor);
                set_gpu_device_sm_utilization(infos[i].pid, cudadev, 0);
            }
            continue;
        }
        for (i = 0; i < processes_num; i++) {
            proc = find_proc_by_hostpid(processes_sample[i].pid);
            if (proc != NULL) {
                sum += processes_sample[i].smUtil;
                summonitor += infos[i].usedGpuMemory;
                set_gpu_device_memory_monitor(processes_sample[i].pid, cudadev, summonitor);
                set_gpu_device_sm_utilization(processes_sample[i].pid, cudadev, processes_sample[i].smUtil);
            }
        }
        if (sum < 0)
            sum = 0;
        userutil[cudadev] = sum;
    }
    return 0;
}
根据限制值和当前使用情况计算本轮可以增加的 Token
具体要增加多少 Token 则由 delta 方法计算
share = delta(upper_limit, userutil[0], share);
具体如下:
// src/multiprocess/multiprocess_utilization_watcher.c#L77
int delta(int up_limit, int user_current, int share) {
    int utilization_diff =
        abs(up_limit - user_current) < 5 ? 5 : abs(up_limit - user_current);
    int increment =
        g_sm_num * g_sm_num * g_max_thread_per_sm * utilization_diff / 2560;

    /* Accelerate cuda cores allocation when utilization vary widely */
    if (utilization_diff > up_limit / 2) {
        increment = increment * utilization_diff * 2 / (up_limit + 1);
    }

    if (user_current <= up_limit) {
        share = share + increment > g_total_cuda_cores ? g_total_cuda_cores
                                                      : share + increment;
    } else {
        share = share - increment < 0 ? 0 : share - increment;
    }

    return share;
}
以上就是 HAMi-Core 中恢复 Token 的逻辑。
至此,Core Limit 就分析完了。
这也符合,之前 试开源 vGPU 方案 HAMi: core&memory 隔离测 测试的结果,GPU 使用率短期看可能会超过阈值,但是时间拉长来看,平均值始终在阈值附近波动。
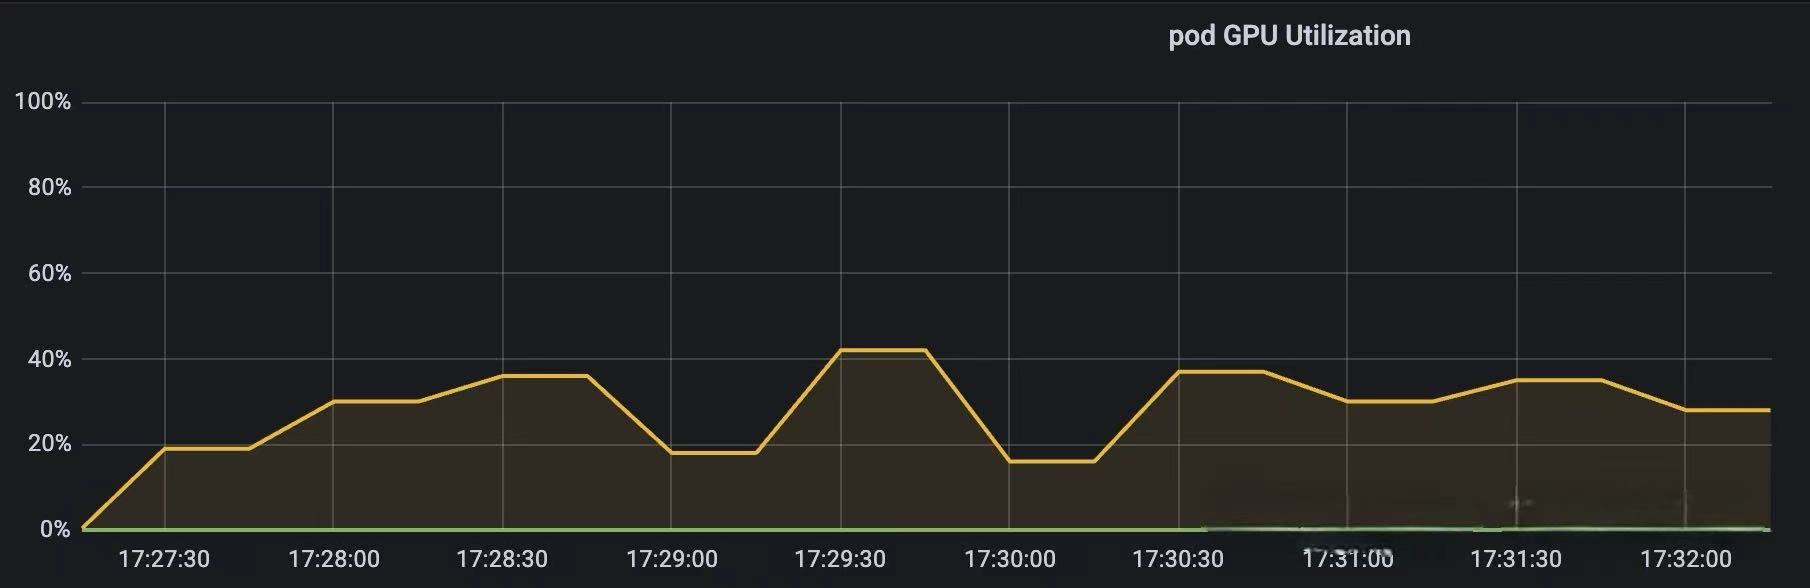
上图为 GPU Core Limit 设置为 30 时的测试结果
5. 小结
本文主要分析了 HAMi Core 的工作原理,HAMi 这边算力限制用的类似令牌桶的形式限制进程对 kernel 的提交,提交 GPU 任务会消耗 token,消耗完之后就不让提交了,等下一轮 token 恢复之后才能继续提交,实现的效果和你说的这个应该差不多。每轮恢复的 token 是固定的,取决于 Pod 创建时申请的 Resource。(大概是这么个情况)。
现在可以回答开篇的几个问题了
libvgpu.so 是怎么生效的?
-
device plugin 在 Allocate 方法中使用 hostPath 方式将宿主机上的 libvgpu.so 挂载到 Pod 中取
-
并通过 LD_PRELOAD 方式实现优先加载上一步中挂载的 libvgpu.so 库
-
通过注入环境变量 CUDA_DEVICE_MEMORY_LIMIT_X 和 CUDA_DEVICE_SM_LIMIT 指定 Memory 和 Core 的阈值
CUDA API 怎么拦截的?
通过重写 dlsym 函数,以劫持 NVIDIA 动态链接库(如 CUDA 和 NVML)的调用,特别是针对以 cu 和 nvml 开头的函数进行拦截。
gpu memory 是怎么限制的?
首先是拦截 NVMLAPI 中的 _nvmlDeviceGetMemoryInfo,实现在执行 nvidia-smi 命令时只展示申请的 Memory(来源于 CUDA_DEVICE_MEMORY_LIMIT_X。
然后是拦截内存分配相关的 CUDA API,比如:cuMemoryAllocate 和 cuMemAlloc_v2。
分配内存之前,增加了 oom_check,当前 Pod 的 GPU 内存使用量 超过 限制的内存使用量(来源于 CUDA_DEVICE_MEMORY_LIMIT_X)时直接返回 OOM。
gpu core 是怎么限制的?
同理,拦截提交 Kernel 相关的 CUDA API,例如:cuLaunchKernel。
提交 Kernel 之前,增加 rate_limit 逻辑,具体算法类似令牌桶,每次提交 kernel 都会消耗 Token,直到某次提交 kernel 发现没有 Token 时就会直接 sleep,一段时间之后 Token 恢复了,又可以继续提交任务了。
恢复 Token 时就会用到 CUDA_DEVICE_SM_LIMIT 环境变量。