HAMi v2.5.0 Released 新特性一览
本文摘自:https://mp.weixin.qq.com/s/Af4GaNVhoCUsE5pzd-jnBg
1.新特性一览
20250206 HAMi 发布了 v2.5.0 版本,新增了动态 MIG 支持的同时稳定性、易用性都有较大提升,以下为主要更新:
完整 Release 信息见:2.5.0-release
功能点:
- 新增动态 MIG 支持,参考文档:dynamic-mig-support
稳定性:
-
现在重装 HAMi 不会导致已有 GPU 任务崩溃了
-
修复当任务使用 cuMallocAsync API 时 hami-core 可能阻塞的问题
-
修复在高 glibc 版本镜像下 (例如:tf-serving:latest) hami-core 可能阻塞的问题
易用性:
-
将所有配置整合到一个 Configmap,便于统一管理,参考文档:config
-
新增部署时自动解析当前集群版本,不需要额外通过参数 scheduler.kubeScheduler.imageTag 指定 kube-scheduler 版本了
-
日志信息增强,以便于更清晰的了解 HAMi 运行情况
-
更新 Grafana Dashboard,更新清晰明了
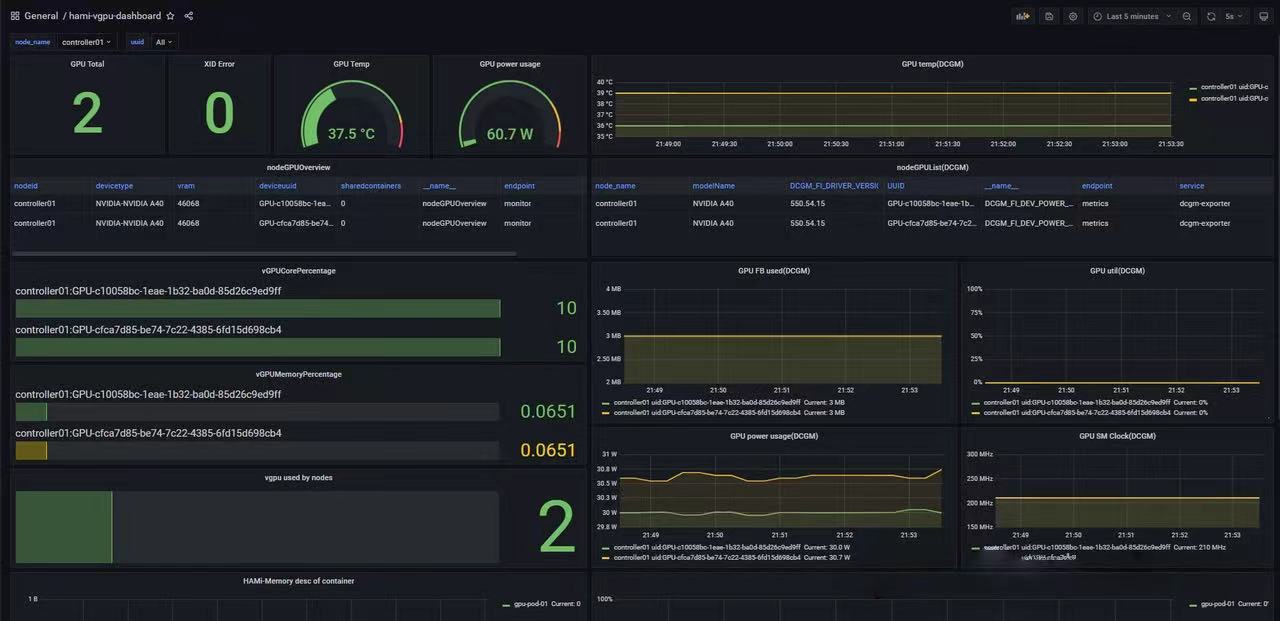
文档:
-
部分文档完善
-
新增 MindMap,便于新用户了解 HAMi 项目
CI:
-
新增部分 UT
-
新增 E2E 测试,保证项目稳定性
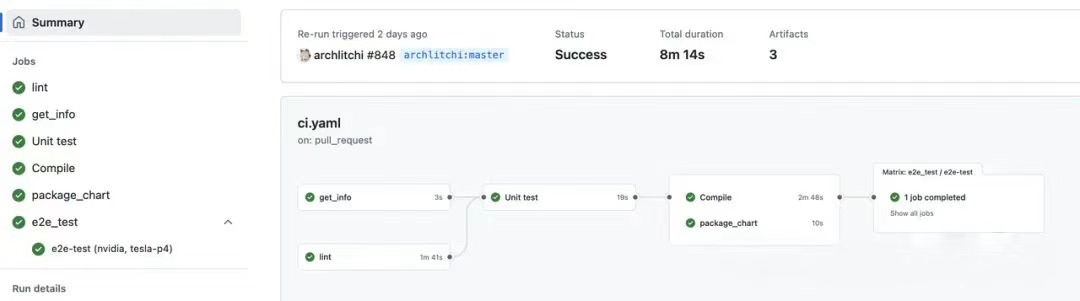
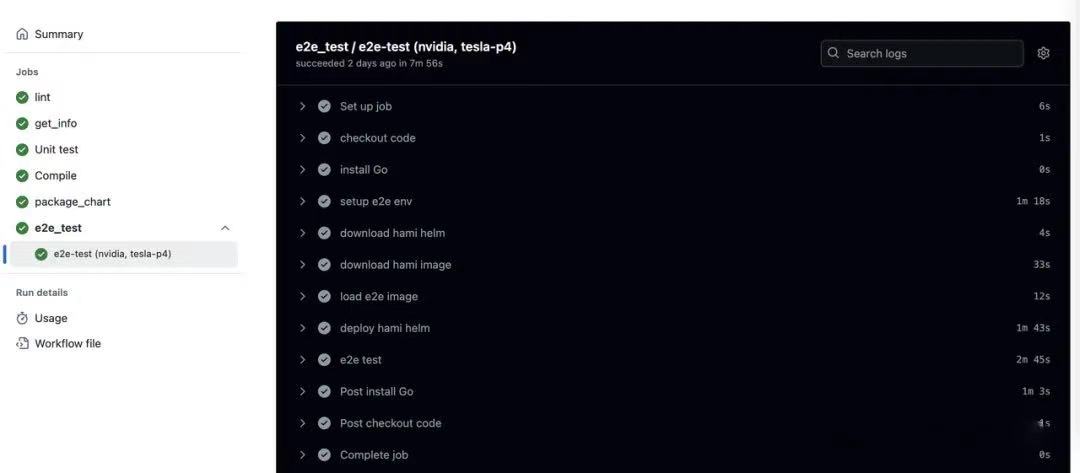
更多更新就留给大家自行发现了~,接下来主要展示稳定性增强部分的工作和动态 MIG 功能的使用演示。
2.稳定性增强
问题描述
之前版本存在一个问题:重启 hami-device-plugin 会影响 GPU 任务。
在 HAMi vGPU 方案原理分析 Part1:hami-device-plugin-nvidia 实现 文章中分享了 HAMi 是如何实现 GPU 的 core 和 memory 隔离的。
实际是通过 libvgpu.so 拦截 CUDA API 完成的。
libvgpu.so 文件的流转过程如下:
-
libvgpu.so 原文件会在构建镜像时存放到 hami-device-plugin 镜像中
-
hami-device-plugin 以 DaemonSet 方式运行,会在所有 (gpu=on 标签) 节点启动,并在 Pod 启动时会将 libvgpu.so 复制到宿主机 /usr/local/vgpu/ 目录
-
hami-device-plugin 为 Pod 分配 GPU 时会将宿主机 libvgpu.so 文件挂载到 Pod 中
问题就出现在第二步:每次 hami-device-plugin Pod 启动时都会重新将 libvgpu.so 复制到宿主机, GPU Pod 中的 libvgpu.so 文件是通过 bind mount 挂载进去的,因此操作宿主机上的 libvgpu.so 文件是可能会对正在运行的 GPU Pod 造成影响的。
例如:程序可能会加载到只复制了一半的 libvgpu.so 文件
hami-device-plugin 相关 yaml 如下:
- name: NVIDIA_MIG_MONITOR_DEVICES
  value: all
- name: HOOK_PATH
  value: /usr/local
image: 192.168.116.54:5000/projecthami/hami:v2.3.13
imagePullPolicy: IfNotPresent
lifecycle:
  postStart:
    exec:
      command:
      - /bin/sh
      - -c
      - cp -f /k8s-vgpu/lib/nvidia/* /usr/local/vgpu/
name: device-plugin
resources: {}
securityContext:
  allowPrivilegeEscalation: false
  capabilities:
    add:
    - SYS_ADMIN
    drop:
    - ALL
terminationMessagePath: /dev/termination-log
terminationMessagePolicy: File
volumeMounts:
- mountPath: /var/lib/kubelet/device-plugins
  name: device-plugin
- mountPath: /usr/local/vgpu
  name: lib
核心部分
lifecycle:
  postStart:
    exec:
      command:
      - /bin/sh
      - -c
      - cp -f /k8s-vgpu/lib/nvidia/* /usr/local/vgpu/
每次启动时都会执行 cp 命令,将 Pod 中的 libvgpu.so 文件复制到宿主机的 /usr/local/vgpu/ 目录。
就是因为该操作会影响到已有的 GPU 任务。
修复方案
相关 PR:[767](https://github.com/Project-HAMi/HAMi/pull/767)
新增 MD5 计算用于确定文件是否相同,如果文件相同,则不重写。
首先是将 cp 命令改成使用一个脚本来完成
# /bin/sh -c cp -f /k8s-vgpu/lib/nvidia/* /usr/local/vgpu/
/bin/sh -c /k8s-vgpu/bin/vgpu-init.sh
vgpu-init.sh 脚本内容如下:
#!/bin/sh

# Check if the destination directory is provided as an argument
if [ -z "$1" ]; then
    echo "Usage: $0 <destination_directory>"
    exit 1
fi

# Source directory
SOURCE_DIR="/k8s-vgpu/lib/nvidia/"

# Destination directory from the argument
DEST_DIR="$1"

# Check if the destination directory exists, create it if it doesn't
if [ ! -d "$DEST_DIR" ]; then
    mkdir -p "$DEST_DIR"
fi

# Traverse all files in the source directory
find "$SOURCE_DIR" -type f | while read -r source_file; do
    # Get the relative path of the source file
    relative_path="${source_file#$SOURCE_DIR}"

    # Construct the destination file path
    dest_file="$DEST_DIR$relative_path"

    # If the destination file doesn't exist, copy the source file
    if [ ! -f "$dest_file" ]; then
        # Create the parent directory of the destination file if it doesn't exist
        mkdir -p "$(dirname "$dest_file")"

        # Copy the file from source to destination
        cp "$source_file" "$dest_file"
        echo "Copied: $source_file -> $dest_file"
    else
        # Compare MD5 values of source and destination files
        source_md5=$(md5sum "$source_file" | cut -d ' ' -f 1)
        dest_md5=$(md5sum "$dest_file" | cut -d ' ' -f 1)

        # If MD5 values are different, copy the file
        if [ "$source_md5" != "$dest_md5" ]; then
            cp "$source_file" "$dest_file"
            echo "Copied: $source_file -> $dest_file"
        else
            echo "Skipped (same MD5): $source_file"
        fi
    fi
done
主要就是做 MD5 验证,仅 MD5 不一致时才会执行 cp 操作进行写入。
# If MD5 values are different, copy the file
if [ "$source_md5" != "$dest_md5" ]; then
    cp "$source_file" "$dest_file"
    echo "Copied: $source_file -> $dest_file"
else
    echo "Skipped (same MD5): $source_file"
fi
同时还做了一个优化,libvgpu.so 新增了一个 version 后缀,变成了 libvgpu.so.2.5.0 这种,这样多版本 libvgpu.so 不会互相影响。
例如:2.5.0 的 device plugin 挂载 libvgpu.so.2.5.0 文件,2.6.0 的就挂载 libvgpu.so.2.6.0,这样 HAMi 升级后也不会影响到已有任务。
// GetLibPath returns the path to the vGPU library.
func GetLibPath() string {
    libPath := hostHookPath + "/vgpu/libvgpu.so." + info.GetVersion()
    if _, err := os.Stat(libPath); os.IsNotExist(err) {
        libPath = hostHookPath + "/vgpu/libvgpu.so"
    }
    return libPath
}
同时 HAMi-core 也更新到了 2.5.0 版本,修复了一些使用上的问题:
-
修复当任务使用 cuMallocAsync API 时 hami-core 可能阻塞的问题
-
修复在高 glibc 版本镜像下 (例如:tf-serving:latest) hami-core 可能阻塞的问题
3. 动态 MIG
昇腾 NPU 借助 Ascend Docker Runtime 是支持动态 vNPU 切分的,在 docker run 启动容器时只需要提供对应环境变量,即可实现在启动容器时进行 vNPU 切分。
例如,以下命令表示从物理芯片 ID 为 0 的芯片上,切分出 4 个 AI Core 作为 vNPU 并挂载至容器,另外以此方式拉起的容器,在结束容器进程时,虚拟设备会自动销毁。
docker run -it --rm -e ASCEND_VISIBLE_DEVICES=0 -e ASCEND_VNPU_SPECS=vir04 image-name:tag /bin/bash
通过 ASCEND_VISIBLE_DEVICES 和 ASCEND_VNPU_SPECS 两个环境变量指定。
对于 NVIDIA 的 MIG 则需要先手动切分好,才能够使用,需要挨个节点执行 nvidia-smi -i 0 -mig 1' 类似的命令来管理 MIG 实例。
好消息是 HAMi 2.5.0 版本提供了 Dynamic MIG 支持,可以在容器启动时自动进行切分,而不需要提前手动切分,相关工作都有 HAMi 统一管理:
-
动态 MIG 实例管理:用户不需要在节点上事先生成 MIG 实例,HAMi 会根据任务需要自动创建
-
动态切换 MIG 切分方案:HAMi 会根据设备上的任务情况和新任务的需求,动态的切换 MIG 模版
-
MIG 实例监控:每个由 HAMi 管理的 MIG 实例都可以在调度器监控中找到,用户可以通过该监控清晰地获取整个集群的 MIG 视图
-
可与使用 hami-core 的节点进行统一的资源池化:HAMi 将 MIG 与 hami-core 这两种切分方案进行了统一的池化处理,若任务未指定切分模式的话,分配给 hami-core 或者 mig 都是有可能的
-
统一的 API: 使用动态 MIG 功能完全不需要进行任务层的适配工作
Demo
前置条件
-
首先就是 GPU 要支持 MIG,Blackwell and Hopper™ and Ampere 架构的 GPU 是都支持的(例如 B100/200、H100、A100/30)
-
其次则是 HAMi >= 2.5.0 版本
-
最后则是节点上安装好 NVIDIA-Container-Toolkit
Enable Feature
首先,需要先开启该特性,编辑名为 hami-device-plugin 的 configmap 进行修改
kubectl -n kube-system edit hami-device-plugin
默认内容如下:
apiVersion: v1
data:
  config.json: |
    {
        "nodeconfig": [
            {
                "name": "m5-cloudinfra-online02",
                "devicememoryscaling": 1.8,
                "devicesplitcount": 10,
                "migstrategy": "none",
                "filterdevices": {
                    "uuid": [],
                    "index": []
                }
            }
        ]
    }
开启 MIG 时的内容如下:
{
    "nodeconfig": [
        {
            "name": "MIG-NODE-A",
            "operatingmode": "mig",
            "filterdevices": {
                "uuid": [],
                "index": []
            }
        }
    ]
}
-
name:改成对于节点名称
-
operatingmode:改为 mig 即可
比如上述配置表示,将名为 MIG-NODE-A 的节点切换为 mig 模式,这样后续该节点就会通过 MIG 切分 vGPU,而不借助 libvgpu.so 来实现。
修改完配置后重启以下 Pod 使上面修改的配置生效。
-
hami-scheduler
-
在'MIG-NODE-A'上的 hami-device-plugin
自定义模版
上一步只是将 Node 切换到了 mig 模式,还需要配置 MIG 模版。
HAMi 提供了默认模板: MIG 配置模板[5],A30、A100 40G、A100 80G 等 GPU 都可以直接使用。
MIG 切分也是有固定模版的,虽然能组合但也不能任意切分,HAMi 也是提供了一些默认模版,例如 A100/30 的:
knownMigGeometries:
  - models: ["A30"]
    allowedGeometries:
      - name: 1g.6gb
        memory: 6144
        count: 4
      - name: 2g.12gb
        memory: 12288
        count: 2
      - name: 4g.24gb
        memory: 24576
        count: 1
  - models: ["A100-SXM4-40GB", "A100-40GB-PCIe", "A100-PCIE-40GB", "A100-SXM4-40GB"]
    allowedGeometries:
      - name: 1g.5gb
        memory: 5120
        count: 7
      - name: 2g.10gb
        memory: 10240
        count: 3
      - name: 1g.5gb
        memory: 5120
        count: 1
      - name: 3g.20gb
        memory: 20480
        count: 2
      - name: 7g.40gb
        memory: 40960
        count: 1
  - models: ["A100-SXM4-80GB", "A100-80GB-PCIe", "A100-PCIE-80GB"]
    allowedGeometries:
      - name: 1g.10gb
        memory: 10240
        count: 7
      - name: 2g.20gb
        memory: 20480
        count: 3
      - name: 1g.10gb
        memory: 10240
        count: 1
      - name: 3g.40gb
        memory: 40960
        count: 2
      - name: 7g.79gb
        memory: 80896
        count: 1
以 A100 40G 为例:
- models: ["A100-SXM4-40GB", "A100-40GB-PCIe", "A100-PCIE-40GB", "A100-SXM4-40GB"]
  allowedGeometries:
    - name: 1g.5gb
      memory: 5120
      count: 7
    - name: 2g.10gb
      memory: 10240
      count: 3
    - name: 1g.5gb
      memory: 5120
      count: 1
    - name: 3g.20gb
      memory: 20480
      count: 2
    - name: 7g.40gb
      memory: 40960
      count: 1
该 GPU 共 7 个计算单元 + 40 G 显存,考虑到计算单元和显存的组合关系,HAMi 默认共提供了 4 种模版:
-
1g.5gb * 7
-
2g.10gb 3 + 1g.5gb 1
-
3g.20gb * 2
-
7g.40gb * 1
当然,也不是随意组合的,可以通过 nvidia-smi mig -lgip 命令查看可用的排列组合:
$ sudo nvidia-smi mig -lgip
+-----------------------------------------------------------------------------+
| GPU instance profiles:                                                      |
| GPU   Name             ID    Instances   Memory     P2P    SM    DEC   ENC  |
|                              Free/Total   GiB              CE    JPEG  OFA  |
|=============================================================================|
|   0  MIG 1g.5gb        19     0/7        4.75       No     14     0     0   |
|                                                             1     0     0   |
+-----------------------------------------------------------------------------+
|   0  MIG 1g.5gb+me     20     0/1        4.75       No     14     1     0   |
|                                                             1     1     1   |
+-----------------------------------------------------------------------------+
|   0  MIG 2g.10gb       14     0/3        9.75       No     28     1     0   |
|                                                             2     0     0   |
+-----------------------------------------------------------------------------+
|   0  MIG 3g.20gb        9     0/2        19.62      No     42     2     0   |
|                                                             3     0     0   |
+-----------------------------------------------------------------------------+
|   0  MIG 4g.20gb        5     0/1        19.62      No     56     2     0   |
|                                                             4     0     0   |
+-----------------------------------------------------------------------------+
|   0  MIG 7g.40gb        0     0/1        39.50      No     98     5     0   |
|                                                             7     1     1   |
+-----------------------------------------------------------------------------+
可以看到 HAMi 提供的默认模板也是从可用模板中挑选然后进行组合的,如果有特殊需求也可以自行定义模板,编辑 hami-scheduler-device configmap 即可。
kubectl -n kube-system edit cm hami-scheduler-device
编辑完成后,重启以下 Pod:
-
hami-scheduler
-
hami-scheduler-device
创建 Job 申请 MIG Instance
创建 Pod 使用 MIG Instance 使用 hami-core 相同的方式进行申请,只需要指定 nvidia.com/gpu 和 nvidia.com/gpumem 即可。
apiVersion: v1
kind: Pod
metadata:
  name: gpu-pod
spec:
  containers:
    - name: ubuntu-container
      image: ubuntu:18.04
      command: ["bash", "-c", "sleep 86400"]
      resources:
        limits:
          nvidia.com/gpu: 2
          nvidia.com/gpumem: 8000
该 Pod 可以被调度到 HAMi-core 节点或者 mig 节点,如果要指定调度到 MIG 节点,也可以通过增加 nvidia.com/vgpu-mode: "mig" 这个 annotation 来实现,例如:
apiVersion: v1
kind: Pod
metadata:
  name: gpu-pod
  annotations:
    nvidia.com/vgpu-mode: "mig" #(Optional), if not set, this pod can be assigned to a MIG instance or a hami-core instance
spec:
  containers:
    - name: ubuntu-container
      image: ubuntu:18.04
      command: ["bash", "-c", "sleep 86400"]
      resources:
        limits:
          nvidia.com/gpu: 2
          nvidia.com/gpumem: 8000
在上面的例子中,该任务申请了 2 个 MIG 实例,每个实例至少需要 8G 显存。
HAMi 会在上述定义的 MIG 模版中的依次查找,直到找到一个可以运行任务的模版。
以 A100 40G 模板为例:
- models: ["A100-SXM4-40GB", "A100-40GB-PCIe", "A100-PCIE-40GB", "A100-SXM4-40GB"]
  allowedGeometries:
    - name: 1g.5gb
      memory: 5120
      count: 7
    - name: 2g.10gb
      memory: 10240
      count: 3
    - name: 1g.5gb
      memory: 5120
      count: 1
    - name: 3g.20gb
      memory: 20480
      count: 2
    - name: 7g.40gb
      memory: 40960
      count: 1
主要是匹配显存,比如这里 8G 显存,第一个模板 1g.5gb 不满足条件,第二 2g.10gb、第三个 3g.20gb、第四个 7g.40gb 都是满足的,但是后面两个就浪费太多了,因此会匹配到第二个模板,即:2g.10gb 3 + 1g.5gb1。
会选择显存满足条件但是又不浪费太多的模板。
由于该 Pod 申请的是 2 vGPU,因此会占用两个 2g.10gb MIG 实例,该模板下还可以切分出一个 2g.10gb 和一个 1g.5gb 的 MIG 实例。
此时,如果在创建一个申请 20G 内存的 Pod,该 GPU 就无法调度了,虽然 GPU 内存够,但是该模板现在只剩下一个 2g.10gb 和 1g.5gb 实例了,不满足需求。
对于特殊需求,我们也可以修改模板,比如下面这样:
- name: 2g.10gb
  memory: 10240
  count: 2
- name: 3g.20gb
  memory: 20480
  count: 1
监控
在 scheduler monitor 中可以看到 MIG 信息 (scheduler node ip:31993/metrics),如下:
# HELP nodeGPUMigInstance GPU Sharing mode. 0 for hami-core, 1 for mig, 2 for mps
# TYPE nodeGPUMigInstance gauge
nodeGPUMigInstance{deviceidx="0",deviceuuid="GPU-936619fc-f6a1-74a8-0bc6-ecf6b3269313",migname="3g.20gb-0",nodeid="aio-node15",zone="vGPU"} 1
nodeGPUMigInstance{deviceidx="0",deviceuuid="GPU-936619fc-f6a1-74a8-0bc6-ecf6b3269313",migname="3g.20gb-1",nodeid="aio-node15",zone="vGPU"} 0
nodeGPUMigInstance{deviceidx="1",deviceuuid="GPU-30f90f49-43ab-0a78-bf5c-93ed41ef2da2",migname="3g.20gb-0",nodeid="aio-node15",zone="vGPU"} 1
nodeGPUMigInstance{deviceidx="1",deviceuuid="GPU-30f90f49-43ab-0a78-bf5c-93ed41ef2da2",migname="3g.20gb-1",nodeid="aio-node15",zone="vGPU"} 1
设计原理
https://github.com/Project-HAMi/HAMi/blob/master/docs/develop/dynamic-mig.md
动态 MIG 的核心就是开发一个自动切片插件,能够在用户需要的时候自动完成 MIG 切分。
在 HAMi 中自动切片功能由 hami-device-plugin 实现。
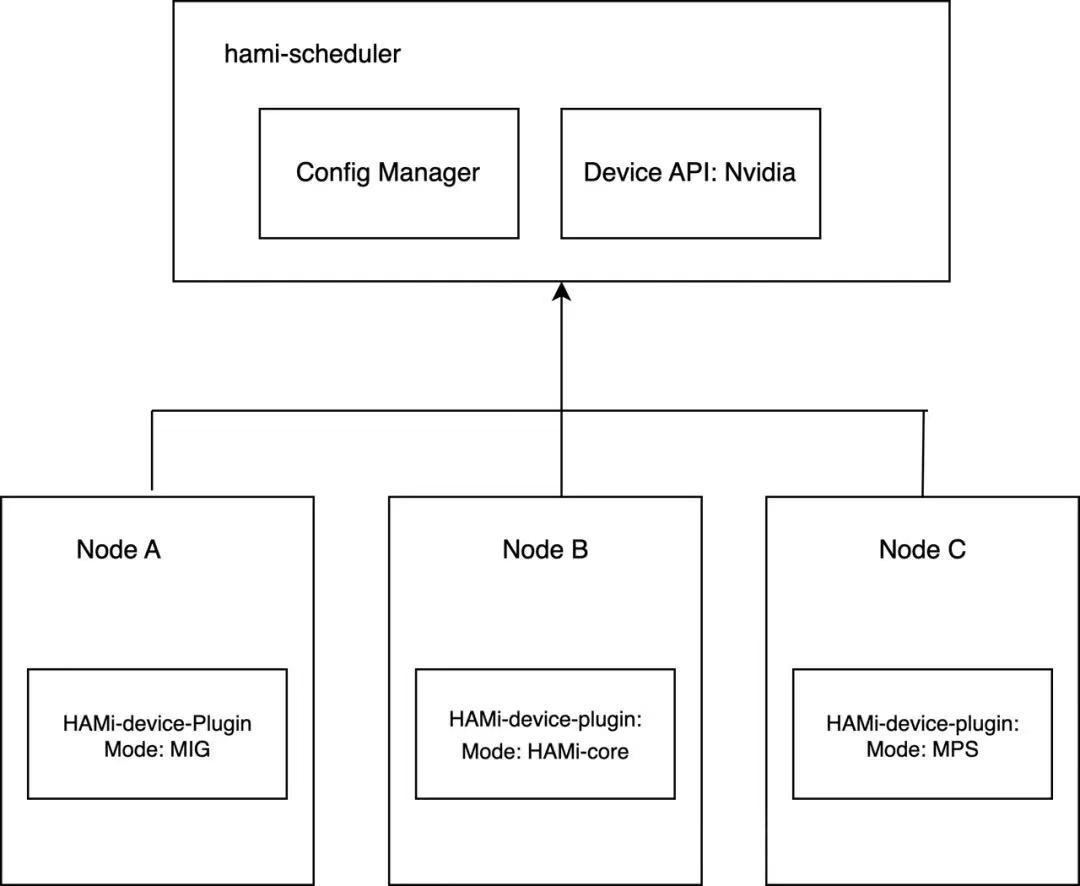
多模式支持
通过 hami-device-plugin 支持不同模式来分别支持 MIG、HAMi-core 以及 MPS。
工作流程
使用 dynamic-mig 的 vGPU 任务流程如下:
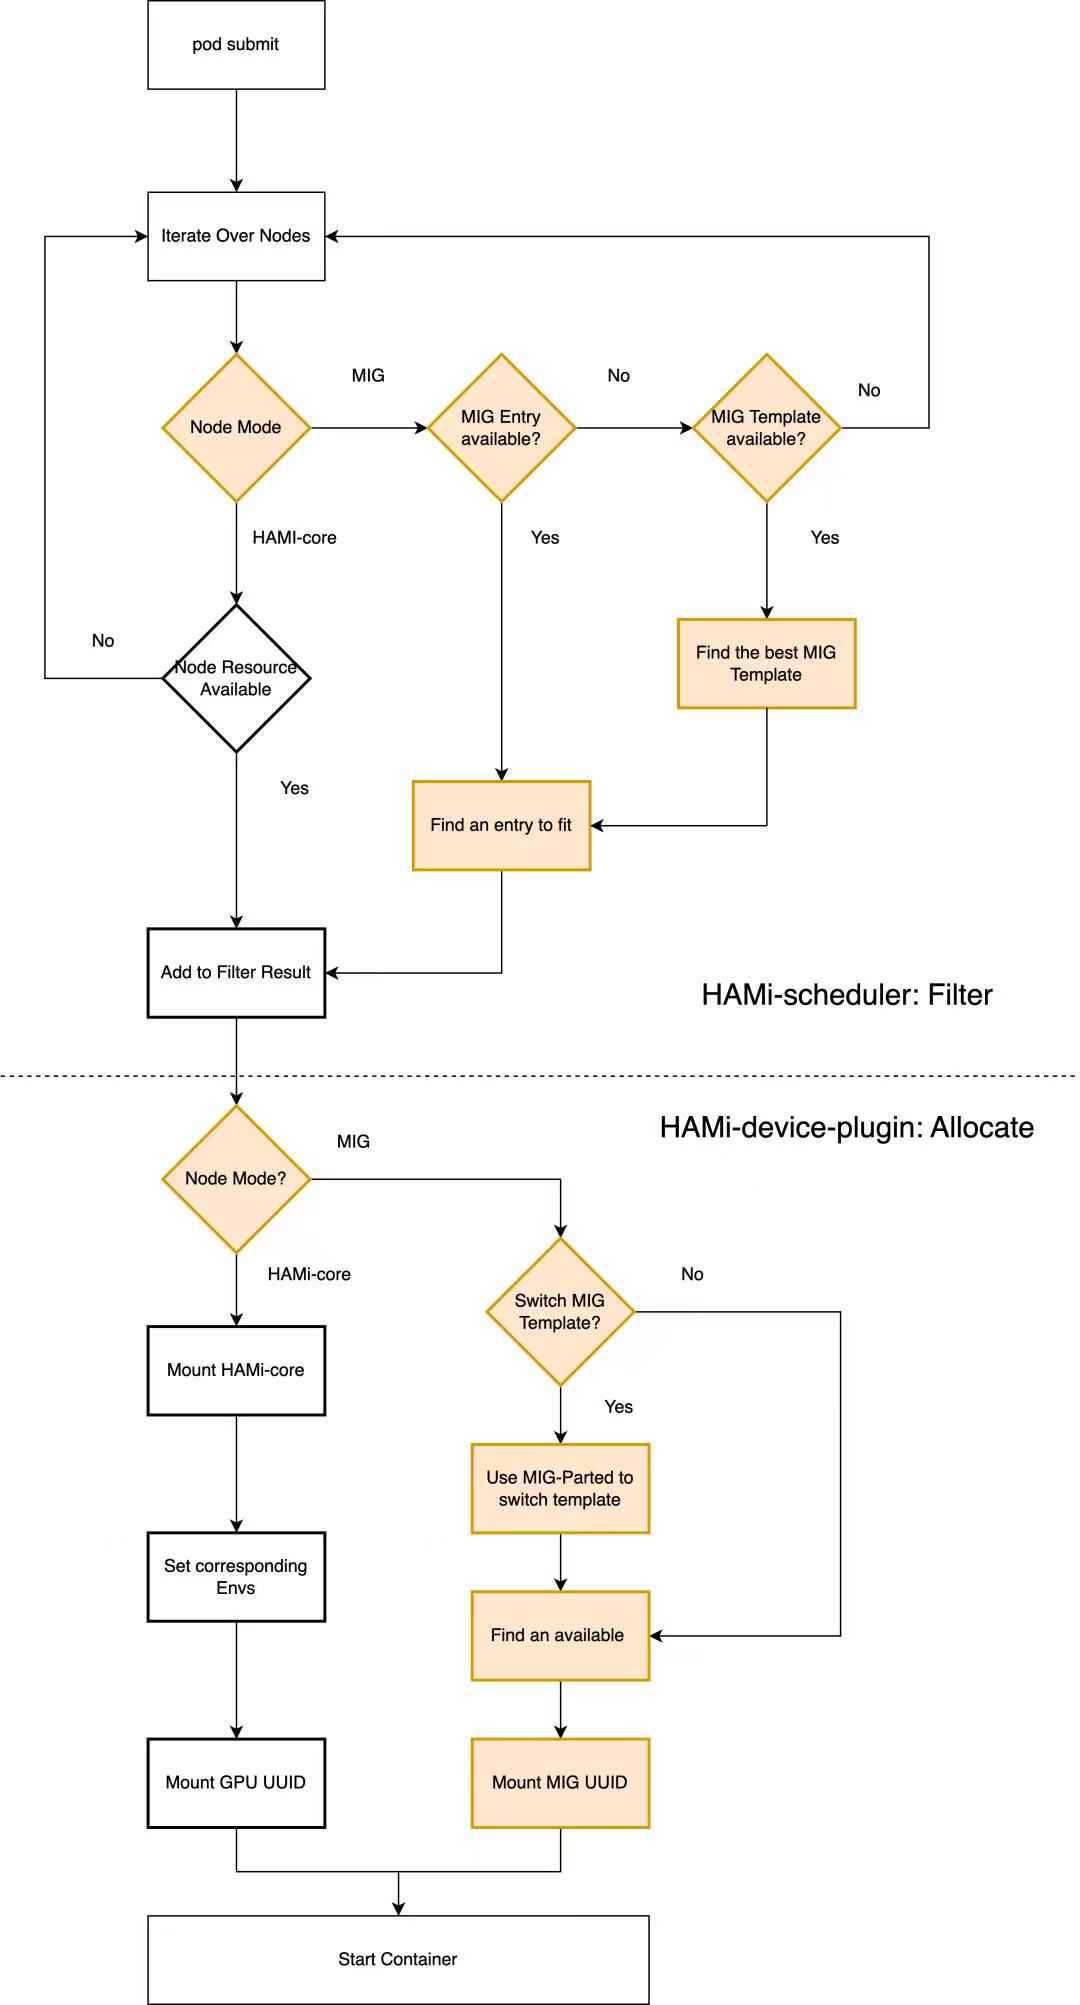
整个流程也是分为两部分:
-
hami-scheduler Filter 接口:找到满足条件的节点
-
hami-device-pluign Allocate 接口:将上一步中指定的 MIG 实例切分出来 (如果之前未切分) 并分配给 Pod
MIG 模式和 HAMi-core 模式区别如下:
- Filter 部分
-
HAMi-core 模式下直接根据 Node 上的 GPU Resource 进行过滤和打分,选择合适的 Node、GPU
-
MIG 模式下,则是根据 MIG 实例或者 MIG 模板,根据显存匹配,找到最合适的模板或实例
- Allocate 部分:
-
HAMi-core 模式下,借助 libvgpu.so 实现 Qos,因此需要挂载 libvgpu.so 并根据申请资源指定环境变量,最后挂载 GPU 到 Pod 中
-
MIG 模式下则是切分 MIG 实例,然后将 MIG 实例挂载到 Pod 中
优缺点
MIG 模式相比于 hami-core 模式优点如下:
-
硬件级别的资源隔离: MIG 通过硬件分割 GPU,使得每个虚拟 GPU 都像一个独立的物理 GPU 一样运行。每个虚拟 GPU 具有自己的内存和计算资源,并且不会与其他虚拟 GPU 竞争,提供更强的隔离性。
-
更好的性能优化:不需要使用 libvgpu.so 拦截 CUDA API,性能会有所提升
-
更好的稳定性和容错性: MIG 可以避免一个任务的失败影响到其他任务的运行,因为每个虚拟 GPU 都是独立的。当一个虚拟 GPU 遇到问题时,其他虚拟 GPU 的计算资源和状态不会受到影响,从而提高了系统的稳定性。
当然了 hami-core 模式也有自己的优势:可以任意粒度切分 core、memory。
根据使用场景,二者可以结合使用。