HAMi v2.5.0 Released: A Look at the New Features
This article is adapted from: https://mp.weixin.qq.com/s/Af4GaNVhoCUsE5pzd-jnBg
1. Overview of New Features
On 2025-02-06, HAMi v2.5.0 was released, adding dynamic MIG support while also significantly improving stability and usability. Here are the main updates:
For complete release information, see: 2.5.0-release
Features:
- Added dynamic MIG support, see documentation: dynamic-mig-support.
Stability:
- Reinstalling HAMi will no longer cause existing GPU tasks to crash.
- Fixed an issue where hami-core could get stuck when tasks used the cuMallocAsync API.
- Fixed an issue where hami-core could get stuck in images with high glibc versions (e.g., tf-serving:latest).
Usability:
- Consolidated all configurations into a single Configmap for unified management, see documentation: config.
- Added automatic detection of the current cluster version during deployment, eliminating the need to specify the kube-scheduler version via the
scheduler.kubeScheduler.imageTagparameter. - Enhanced log information to provide a clearer understanding of HAMi's operation.
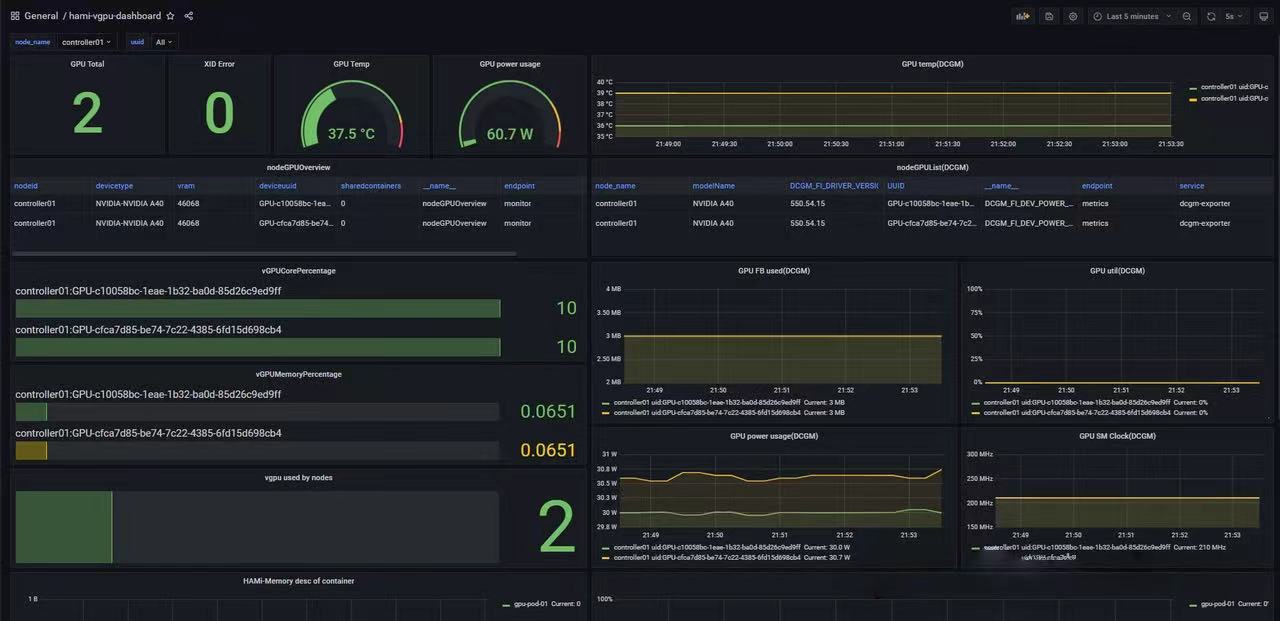
- Updated Grafana Dashboard for a clearer and more intuitive interface.
Documentation:
- Improved several documents.
- Added a MindMap to help new users understand the HAMi project.
CI:
- Added more unit tests.
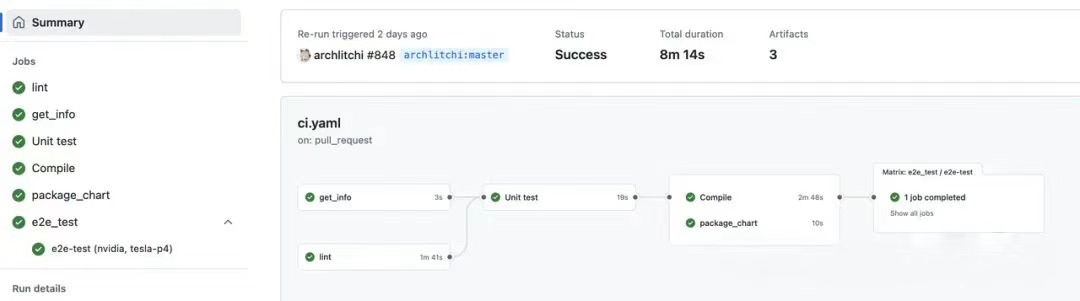
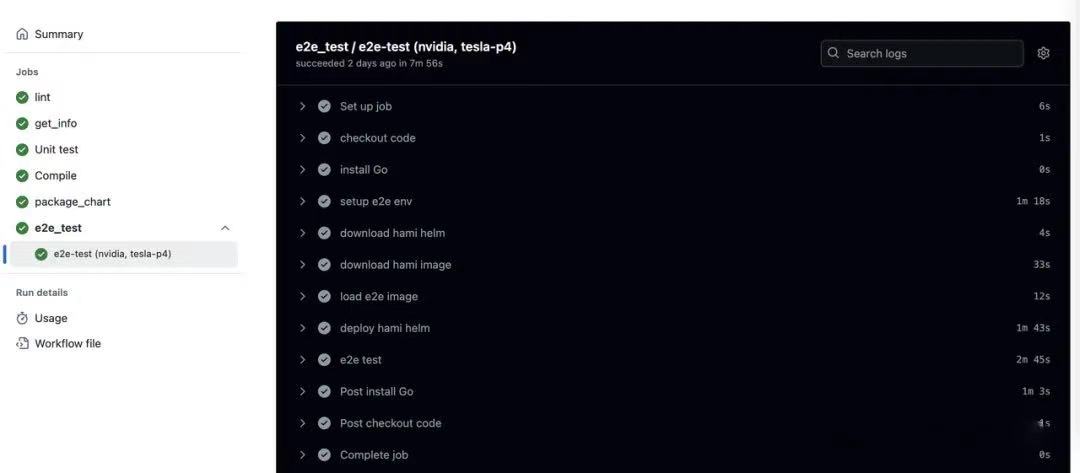
- Added E2E tests to ensure project stability.
We'll leave more updates for you to discover on your own. Next, we will mainly demonstrate the stability enhancements and the use of the dynamic MIG feature.
2. Stability Enhancements
Problem Description
Previous versions had an issue: restarting hami-device-plugin would affect GPU tasks.
In the article HAMi vGPU Solution Analysis Part 1: hami-device-plugin-nvidia Implementation, we shared how HAMi achieves GPU core and memory isolation.
This is actually done by intercepting CUDA APIs with libvgpu.so.
The flow of the libvgpu.so file is as follows:
- The original
libvgpu.sofile is placed in the hami-device-plugin image during the build process. - The hami-device-plugin runs as a DaemonSet, starting on all nodes (with the
gpu=onlabel), and copieslibvgpu.soto the host's/usr/local/vgpu/directory when the Pod starts. - When hami-device-plugin allocates a GPU to a Pod, it mounts the
libvgpu.sofile from the host into the Pod.
The problem occurs in the second step: every time the hami-device-plugin Pod starts, it re-copies libvgpu.so to the host. The libvgpu.so file in the GPU Pod is bind-mounted, so operating on the libvgpu.so file on the host can affect running GPU Pods.
For example, a program might load a partially copied libvgpu.so file.
The relevant YAML for hami-device-plugin is as follows:
- name: NVIDIA_MIG_MONITOR_DEVICES
  value: all
- name: HOOK_PATH
  value: /usr/local
image: 192.168.116.54:5000/projecthami/hami:v2.3.13
imagePullPolicy: IfNotPresent
lifecycle:
  postStart:
    exec:
      command:
      - /bin/sh
      - -c
      - cp -f /k8s-vgpu/lib/nvidia/* /usr/local/vgpu/
name: device-plugin
resources: {}
securityContext:
  allowPrivilegeEscalation: false
  capabilities:
    add:
    - SYS_ADMIN
    drop:
    - ALL
terminationMessagePath: /dev/termination-log
terminationMessagePolicy: File
volumeMounts:
- mountPath: /var/lib/kubelet/device-plugins
  name: device-plugin
- mountPath: /usr/local/vgpu
  name: lib
The core part is:
lifecycle:
  postStart:
    exec:
      command:
      - /bin/sh
      - -c
      - cp -f /k8s-vgpu/lib/nvidia/* /usr/local/vgpu/
The cp command is executed every time it starts, copying the libvgpu.so file from the Pod to the host's /usr/local/vgpu/ directory.
This operation is what affects existing GPU tasks.
Solution
Related PR:(https://github.com/Project-HAMi/HAMi/pull/767)
An MD5 check was added to determine if the files are identical. If the files are the same, they are not overwritten.
First, the cp command was replaced with a script:
# /bin/sh -c cp -f /k8s-vgpu/lib/nvidia/* /usr/local/vgpu/
/bin/sh -c /k8s-vgpu/bin/vgpu-init.sh
The content of the vgpu-init.sh script is as follows:
#!/bin/sh

# Check if the destination directory is provided as an argument
if [ -z "$1" ]; then
    echo "Usage: $0 <destination_directory>"
    exit 1
fi

# Source directory
SOURCE_DIR="/k8s-vgpu/lib/nvidia/"

# Destination directory from the argument
DEST_DIR="$1"

# Check if the destination directory exists, create it if it doesn't
if [ ! -d "$DEST_DIR" ]; then
    mkdir -p "$DEST_DIR"
fi

# Traverse all files in the source directory
find "$SOURCE_DIR" -type f | while read -r source_file; do
    # Get the relative path of the source file
    relative_path="${source_file#$SOURCE_DIR}"

    # Construct the destination file path
    dest_file="$DEST_DIR$relative_path"

    # If the destination file doesn't exist, copy the source file
    if [ ! -f "$dest_file" ]; then
        # Create the parent directory of the destination file if it doesn't exist
        mkdir -p "$(dirname "$dest_file")"

        # Copy the file from source to destination
        cp "$source_file" "$dest_file"
        echo "Copied: $source_file -> $dest_file"
    else
        # Compare MD5 values of source and destination files
        source_md5=$(md5sum "$source_file" | cut -d ' ' -f 1)
        dest_md5=$(md5sum "$dest_file" | cut -d ' ' -f 1)

        # If MD5 values are different, copy the file
        if [ "$source_md5" != "$dest_md5" ]; then
            cp "$source_file" "$dest_file"
            echo "Copied: $source_file -> $dest_file"
        else
            echo "Skipped (same MD5): $source_file"
        fi
    fi
done
The main idea is to perform an MD5 validation, and only execute the cp operation if the MD5 hashes are different.
# If MD5 values are different, copy the file
if [ "$source_md5" != "$dest_md5" ]; then
    cp "$source_file" "$dest_file"
    echo "Copied: $source_file -> $dest_file"
else
    echo "Skipped (same MD5): $source_file"
fi
At the same time, an optimization was made: a version suffix was added to libvgpu.so, making it libvgpu.so.2.5.0. This way, multiple versions of libvgpu.so will not interfere with each other.
For example, the 2.5.0 device plugin mounts the
libvgpu.so.2.5.0file, and the 2.6.0 version will mountlibvgpu.so.2.6.0, so upgrading HAMi will not affect existing tasks.
// GetLibPath returns the path to the vGPU library.
func GetLibPath() string {
    libPath := hostHookPath + "/vgpu/libvgpu.so." + info.GetVersion()
    if _, err := os.Stat(libPath); os.IsNotExist(err) {
        libPath = hostHookPath + "/vgpu/libvgpu.so"
    }
    return libPath
}
HAMi-core was also updated to version 2.5.0, fixing some usability issues:
- Fixed an issue where hami-core could get stuck when tasks used the cuMallocAsync API.
- Fixed an issue where hami-core could get stuck in images with high glibc versions (e.g., tf-serving:latest).
3. Dynamic MIG
Ascend NPUs, with the help of the Ascend Docker Runtime, support dynamic vNPU slicing. When starting a container with docker run, you can provide corresponding environment variables to achieve vNPU slicing at container startup.
For example, the following command means slicing 4 AI Cores from the physical chip with ID 0 as a vNPU and mounting it to the container. In addition, for containers launched in this way, the virtual device will be automatically destroyed when the container process ends.
docker run -it --rm -e ASCEND_VISIBLE_DEVICES=0 -e ASCEND_VNPU_SPECS=vir04 image-name:tag /bin/bash
Specified through the
ASCEND_VISIBLE_DEVICESandASCEND_VNPU_SPECSenvironment variables.
For NVIDIA's MIG, you need to manually slice it before you can use it, by executing commands like nvidia-smi -i 0 -mig 1 on each node to manage MIG instances.
The good news is that HAMi 2.5.0 provides Dynamic MIG support, which can automatically perform slicing when the container starts, without the need for manual pre-slicing. All related work is uniformly managed by HAMi:
- Dynamic MIG Instance Management: Users do not need to generate MIG instances on the node in advance; HAMi will automatically create them according to the needs of the task.
- Dynamic Switching of MIG Slicing Schemes: HAMi will dynamically switch MIG templates based on the task situation on the device and the needs of new tasks.
- MIG Instance Monitoring: Every MIG instance managed by HAMi can be found in the scheduler monitor, through which users can clearly obtain the MIG view of the entire cluster.
- Unified Resource Pooling with hami-core nodes: HAMi has unified the pooling of MIG and hami-core slicing schemes. If the task does not specify a slicing mode, it is possible to be allocated to either hami-core or MIG.
- Unified API: Using the dynamic MIG feature requires no task-level adaptation work at all.
Demo
Prerequisites
- First, the GPU must support MIG. GPUs with Blackwell, Hopper™, and Ampere architectures all support it (e.g., B100/200, H100, A100/30).
- Second, HAMi version must be >= 2.5.0.
- Finally, NVIDIA-Container-Toolkit must be installed on the node.
Enable Feature
First, you need to enable this feature. Edit the configmap named hami-device-plugin.
kubectl -n kube-system edit cm hami-device-plugin
The default content is as follows:
apiVersion: v1
data:
  config.json: |
    {
        "nodeconfig": [
            {
                "name": "m5-cloudinfra-online02",
                "devicememoryscaling": 1.8,
                "devicesplitcount": 10,
                "migstrategy": "none",
                "filterdevices": {
                    "uuid": [],
                    "index": []
                }
            }
        ]
    }
The content when MIG is enabled is as follows:
{
    "nodeconfig": [
        {
            "name": "MIG-NODE-A",
            "operatingmode": "mig",
            "filterdevices": {
                "uuid": [],
                "index": []
            }
        }
    ]
}
name: change to the corresponding node name.operatingmode: change tomig.
For example, the above configuration means switching the node named
MIG-NODE-Ato mig mode. In the future, this node will use MIG to slice vGPUs instead of relying on libvgpu.so.
After modifying the configuration, restart the following Pods to make the changes take effect.
- hami-scheduler
- hami-device-plugin on 'MIG-NODE-A'
Custom Templates
The previous step only switched the Node to mig mode; you still need to configure the MIG template.
HAMi provides default templates: MIG configuration templates, which can be used directly for GPUs like A30, A100 40G, and A100 80G.
MIG slicing also has fixed templates. Although they can be combined, they cannot be sliced arbitrarily. HAMi also provides some default templates, for example, for A100/30:
knownMigGeometries:
  - models: ["A30"]
    allowedGeometries:
      - name: 1g.6gb
        memory: 6144
        count: 4
      - name: 2g.12gb
        memory: 12288
        count: 2
      - name: 4g.24gb
        memory: 24576
        count: 1
  - models: ["A100-SXM4-40GB", "A100-40GB-PCIe", "A100-PCIE-40GB", "A100-SXM4-40GB"]
    allowedGeometries:
      - name: 1g.5gb
        memory: 5120
        count: 7
      - name: 2g.10gb
        memory: 10240
        count: 3
      - name: 1g.5gb
        memory: 5120
        count: 1
      - name: 3g.20gb
        memory: 20480
        count: 2
      - name: 7g.40gb
        memory: 40960
        count: 1
  - models: ["A100-SXM4-80GB", "A100-80GB-PCIe", "A100-PCIE-80GB"]
    allowedGeometries:
      - name: 1g.10gb
        memory: 10240
        count: 7
      - name: 2g.20gb
        memory: 20480
        count: 3
      - name: 1g.10gb
        memory: 10240
        count: 1
      - name: 3g.40gb
        memory: 40960
        count: 2
      - name: 7g.79gb
        memory: 80896
        count: 1
Take A100 40G as an example:
- models: ["A100-SXM4-40GB", "A100-40GB-PCIe", "A100-PCIE-40GB", "A100-SXM4-40GB"]
  allowedGeometries:
    - name: 1g.5gb
      memory: 5120
      count: 7
    - name: 2g.10gb
      memory: 10240
      count: 3
    - name: 1g.5gb
      memory: 5120
      count: 1
    - name: 3g.20gb
      memory: 20480
      count: 2
    - name: 7g.40gb
      memory: 40960
      count: 1
This GPU has 7 compute units + 40 G of memory. Considering the combination of compute units and memory, HAMi provides 4 default templates:
- 1g.5gb * 7
- 2g.10gb 3 + 1g.5gb 1
- 3g.20gb * 2
- 7g.40gb * 1
Of course, combinations are not arbitrary. You can use the nvidia-smi mig -lgip command to see the available combinations:
$ sudo nvidia-smi mig -lgip
+-----------------------------------------------------------------------------+
| GPU instance profiles:                                                      |
| GPU   Name             ID    Instances   Memory     P2P    SM    DEC   ENC  |
|                              Free/Total   GiB              CE    JPEG  OFA  |
|=============================================================================|
|   0  MIG 1g.5gb        19     0/7        4.75       No     14     0     0   |
|                                                             1     0     0   |
+-----------------------------------------------------------------------------+
|   0  MIG 1g.5gb+me     20     0/1        4.75       No     14     1     0   |
|                                                             1     1     1   |
+-----------------------------------------------------------------------------+
|   0  MIG 2g.10gb       14     0/3        9.75       No     28     1     0   |
|                                                             2     0     0   |
+-----------------------------------------------------------------------------+
|   0  MIG 3g.20gb        9     0/2        19.62      No     42     2     0   |
|                                                             3     0     0   |
+-----------------------------------------------------------------------------+
|   0  MIG 4g.20gb        5     0/1        19.62      No     56     2     0   |
|                                                             4     0     0   |
+-----------------------------------------------------------------------------+
|   0  MIG 7g.40gb        0     0/1        39.50      No     98     5     0   |
|                                                             7     1     1   |
+-----------------------------------------------------------------------------+
You can see that the default templates provided by HAMi are also selected and combined from the available templates. If you have special requirements, you can also define your own templates by editing the hami-scheduler-device configmap.
kubectl -n kube-system edit cm hami-scheduler-device
After editing, restart the following Pods:
- hami-scheduler
- hami-scheduler-device
Create a Job to Request a MIG Instance
Creating a Pod to use a MIG Instance is done in the same way as requesting one with hami-core, by specifying nvidia.com/gpu and nvidia.com/gpumem.
apiVersion: v1
kind: Pod
metadata:
  name: gpu-pod
spec:
  containers:
    - name: ubuntu-container
      image: ubuntu:18.04
      command: ["bash", "-c", "sleep 86400"]
      resources:
        limits:
          nvidia.com/gpu: 2
          nvidia.com/gpumem: 8000
This Pod can be scheduled to a HAMi-core node or a MIG node. To specify scheduling to a MIG node, you can add the nvidia.com/vgpu-mode: "mig" annotation, for example:
apiVersion: v1
kind: Pod
metadata:
  name: gpu-pod
  annotations:
    nvidia.com/vgpu-mode: "mig" #(Optional), if not set, this pod can be assigned to a MIG instance or a hami-core instance
spec:
  containers:
    - name: ubuntu-container
      image: ubuntu:18.04
      command: ["bash", "-c", "sleep 86400"]
      resources:
        limits:
          nvidia.com/gpu: 2
          nvidia.com/gpumem: 8000```
In the example above, this task requests 2 MIG instances, each requiring at least 8G of memory.

HAMi will search through the MIG templates defined above in order, until it finds one that can run the task.

Taking the A100 40G template as an example:

```yaml
- models: ["A100-SXM4-40GB", "A100-40GB-PCIe", "A100-PCIE-40GB", "A100-SXM4-40GB"]
  allowedGeometries:
    - name: 1g.5gb
      memory: 5120
      count: 7
    - name: 2g.10gb
      memory: 10240
      count: 3
    - name: 1g.5gb
      memory: 5120
      count: 1
    - name: 3g.20gb
      memory: 20480
      count: 2
    - name: 7g.40gb
      memory: 40960
      count: 1
The main thing is to match the memory. Here, with 8G of memory requested, the first template 1g.5gb is not sufficient. The second 2g.10gb, third 3g.20gb, and fourth 7g.40gb are all sufficient, but the last two would waste too much memory. Therefore, it will match the second template, which is: 2g.10gb 3 + 1g.5gb 1.
It will choose a template that meets the memory requirement without wasting too much.
Since this Pod requests 2 vGPUs, it will occupy two 2g.10gb MIG instances. Under this template, one more 2g.10gb and one 1g.5gb MIG instance can still be sliced.
At this point, if you create another Pod requesting 20G of memory, it cannot be scheduled on this GPU. Although the GPU has enough memory, this template now only has one 2g.10gb and one 1g.5gb instance left, which does not meet the requirement.
For special requirements, we can also modify the template, for example:
- name: 2g.10gb
  memory: 10240
  count: 2
- name: 3g.20gb
  memory: 20480
  count: 1
Monitoring
MIG information can be seen in the scheduler monitor (scheduler node ip:31993/metrics), as follows:
# HELP nodeGPUMigInstance GPU Sharing mode. 0 for hami-core, 1 for mig, 2 for mps
# TYPE nodeGPUMigInstance gauge
nodeGPUMigInstance{deviceidx="0",deviceuuid="GPU-936619fc-f6a1-74a8-0bc6-ecf6b3269313",migname="3g.20gb-0",nodeid="aio-node15",zone="vGPU"} 1
nodeGPUMigInstance{deviceidx="0",deviceuuid="GPU-936619fc-f6a1-74a8-0bc6-ecf6b3269313",migname="3g.20gb-1",nodeid="aio-node15",zone="vGPU"} 0
nodeGPUMigInstance{deviceidx="1",deviceuuid="GPU-30f90f49-43ab-0a78-bf5c-93ed41ef2da2",migname="3g.20gb-0",nodeid="aio-node15",zone="vGPU"} 1
nodeGPUMigInstance{deviceidx="1",deviceuuid="GPU-30f90f49-43ab-0a78-bf5c-93ed41ef2da2",migname="3g.20gb-1",nodeid="aio-node15",zone="vGPU"} 1
Design Principles
https://github.com/Project-HAMi/HAMi/blob/master/docs/develop/dynamic-mig.md
The core of dynamic MIG is to develop an automatic slicing plugin that can automatically complete MIG slicing when the user needs it.
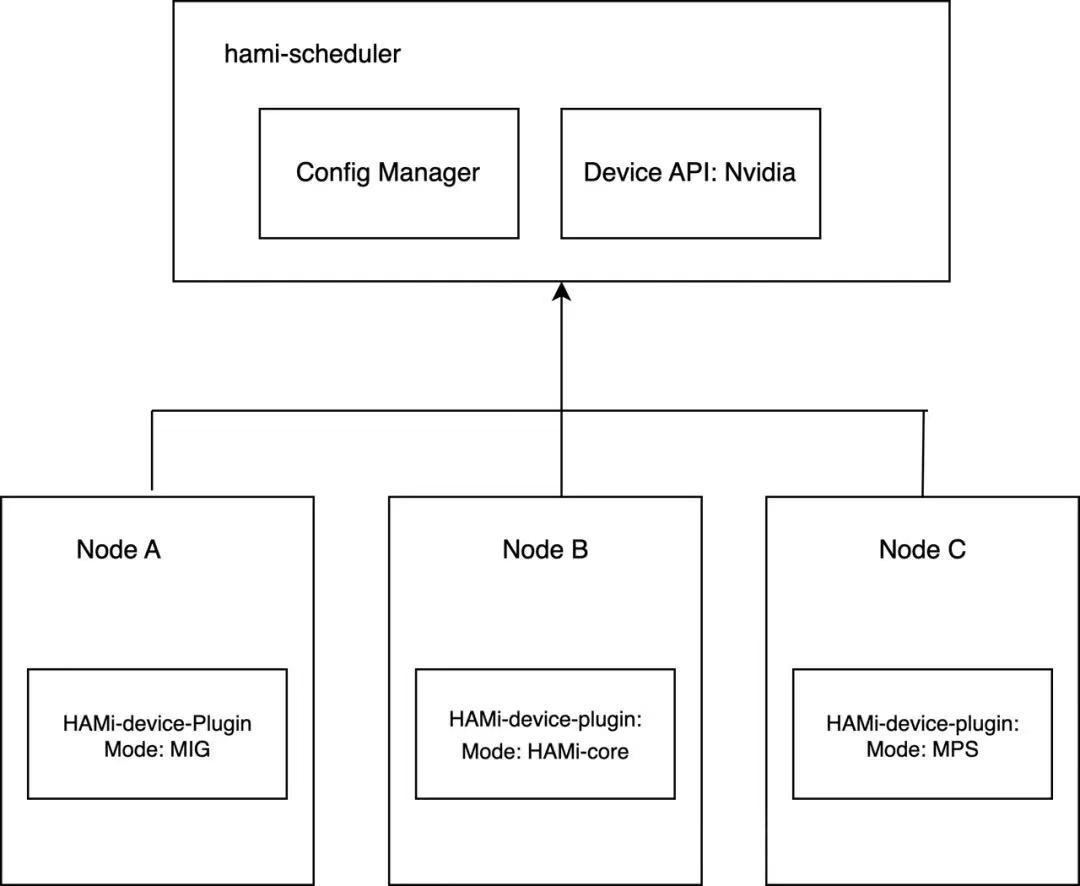
In HAMi, the automatic slicing function is implemented by hami-device-plugin.
Multi-mode Support
Different modes are supported through hami-device-plugin to support MIG, HAMi-core, and MPS respectively.
Workflow
The workflow for a vGPU task using dynamic-mig is as follows:
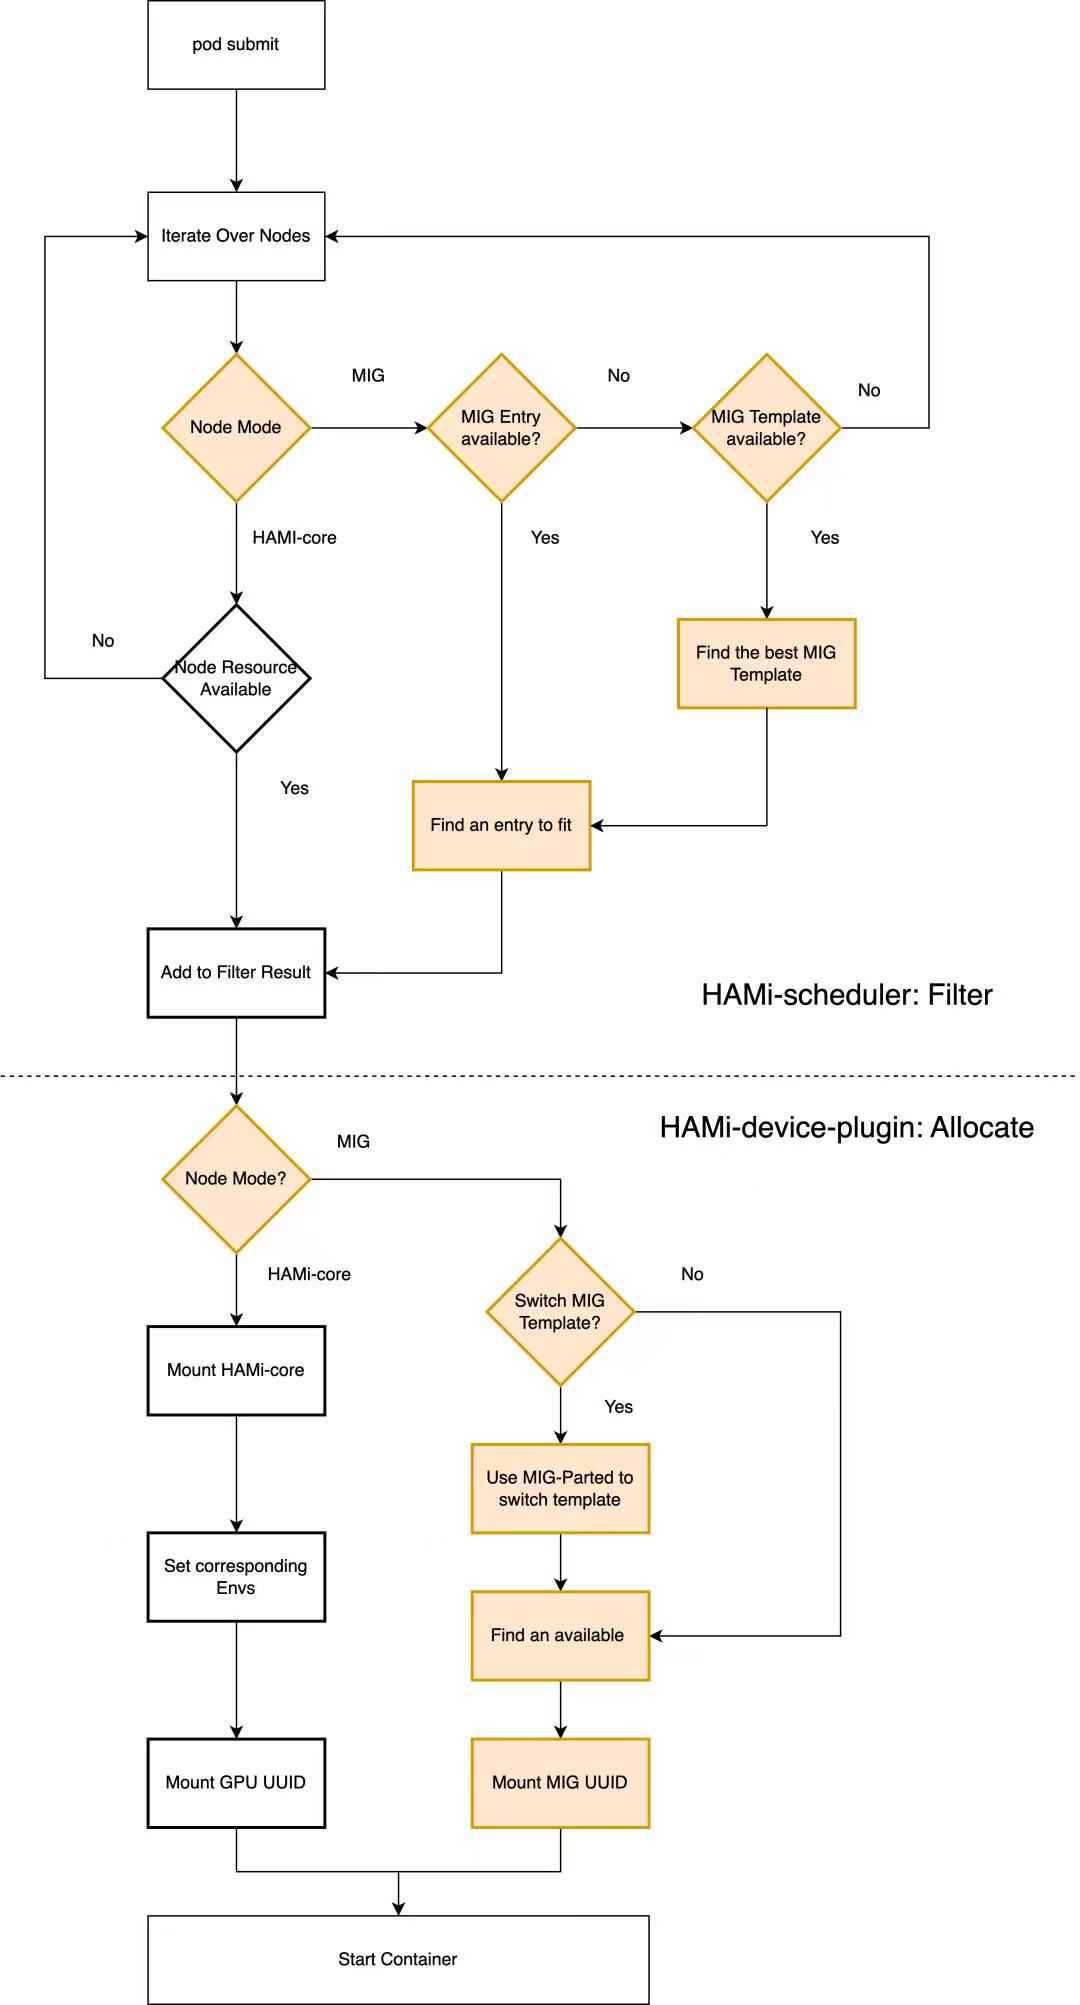
The whole process is also divided into two parts:
- hami-scheduler Filter interface: Find a node that meets the conditions.
- hami-device-plugin Allocate interface: Slice the MIG instance specified in the previous step (if it has not been sliced before) and allocate it to the Pod.
The differences between MIG mode and HAMi-core mode are as follows:
- Filter Part
-
In HAMi-core mode, filtering and scoring are done directly based on the GPU Resource on the Node to select the appropriate Node and GPU.
-
In MIG mode, it is based on MIG instances or MIG templates, matching memory to find the most suitable template or instance.
- Allocate Part:
-
In HAMi-core mode, QoS is implemented with the help of
libvgpu.so, so it is necessary to mountlibvgpu.so, specify environment variables according to the requested resources, and finally mount the GPU to the Pod. -
In MIG mode, it slices the MIG instance and then mounts the MIG instance to the Pod.
Pros and Cons
The advantages of MIG mode compared to hami-core mode are as follows:
- Hardware-level resource isolation: MIG partitions the GPU through hardware, making each virtual GPU run like an independent physical GPU. Each virtual GPU has its own memory and computing resources and does not compete with other virtual GPUs, providing stronger isolation.
- Better performance optimization: There is no need to use
libvgpu.soto intercept CUDA APIs, so performance will be improved. - Better stability and fault tolerance: MIG can prevent the failure of one task from affecting the operation of other tasks, because each virtual GPU is independent. When a virtual GPU encounters a problem, the computing resources and status of other virtual GPUs will not be affected, thereby improving system stability.
Of course, hami-core mode also has its own advantages: it can slice core and memory at any granularity.
Depending on the use case, the two can be used in combination.
To learn more about the HAMi project, please visit our GitHub repository or join our Slack community.